Documentation
Configuration reference
Every field the integration asks for: what it means, what it is measured in, what it defaults to, and when it is worth changing. Nothing here is edited in YAML — the integration is configured entirely through Home Assistant's UI, and this page follows the same order the UI does.
- Initial setup — the questions asked once, when you add the integration
- Changing settings later — the 24 options pages behind two menus
- The hydronic layout catalog — which plumbing arrangements are modelled
- Services — every service and its fields
Only two answers are genuinely required: a price source — a Tibber API token by default, or a price sensor entity instead — and a weather entity. Everything else has a working default. Skipping an optional sensor costs accuracy, or leaves the one feature that needs it dormant, but it never stops the integration from planning.
Initial setup
Settings → Devices & services → Add integration → Heat Pump Cost Optimizer.
The flow is not a straight line. After the two required screens, a menu asks how far to go now, and after the temperatures a second branch chooses how the thermal model gets its starting values:
flowchart TD
    A["1 · Basics<br/>name, price source (Tibber token or price entity),<br/>weather entity"] --> B["2 · Optional sensors<br/>temperatures, on/off switch, solar,<br/>tank probes, pump signals"]
    B --> M{"3 · Finish setup now? A menu:<br/>Quick setup (recommended) ·<br/>Continue setup · Finish setup now"}
    B -. "only if another entry turned the pre-fill<br/>offer on and a device qualifies" .-> P0["Heat pump entities<br/>read from a device<br/>(leave the pick empty to skip)"]
    P0 --> M
    M -- "Quick setup (recommended)" --> Q["Quick setup<br/>five house toggles and<br/>the building questionnaire"]
    Q --> P["Heat pump entities<br/>read from a device<br/>(leave the pick empty to skip)"]
    P -- "back to the menu,<br/>without Quick setup" --> M
    M -- "Finish setup now" --> R["Review and confirm<br/>(read-only summary)"]
    M -- "Continue setup" --> T["4 · Temperatures<br/>target, band, day and night comfort,<br/>day hours"]
    T --> C{"5 · How do you want to<br/>describe your building?"}
    C -- "Describe my building<br/>(recommended)" --> E["Questionnaire<br/>structure, era, foundation,<br/>heated area, emitters"]
    E --> F["Heat pump basics<br/>nominal COP,<br/>max power, min power"]
    C -- "Enter thermal values<br/>directly" --> G["Thermal model<br/>masses, loss coefficient,<br/>COP, power limits"]
    G --> H["Two-zone and solar<br/>per-floor masses, buffer tank,<br/>windows, orientation"]
    F --> I["6 · Hot water<br/>tank, setpoint, time frames,<br/>anti-legionella"]
    H --> I
    I --> K["7 · Weather sensitivity<br/>wind and rain"]
    K --> R
    R --> J(["Confirming creates the entry:<br/>the first plan is solved within<br/>one optimization interval"])
The menu's Quick setup (recommended) answers five house toggles plus the same building questionnaire as Continue setup below, then offers to read the heat pump's own entities off a detected device (see setup.md), and returns to this same menu; Finish setup now moves straight to the review with shipped defaults for everything past the two required screens; Continue setup walks the numbered screens below. (The same pre-fill page can also appear right after the optional-sensors screen, before this menu, when the pre-fill offer is switched on in an existing entry's options (off by default) and a heat-pump device resolves — see Pre-fill from a heat pump device; a fresh install with no entry yet has it off, so this never fires on first setup.) Every route ends on the same read-only review screen, and confirming there is what actually creates the entry.
1 · Basics — Heat Pump Optimizer Setup
Where the prices, the forecast and your own measurements come from. The token is checked against Tibber before the flow continues, and a network failure is reported as a connection problem rather than as a bad token.
| Setting | Default | What it means |
|---|---|---|
| Name for this integration | Heat Pump Optimizer | Shown in front of every entity this integration creates. |
| Electricity price source | Tibber | Where hourly electricity prices come from: Tibber (needs the token below) or a price sensor entity you already have. |
| Tibber API token | — (required with the Tibber source) | Reads your hourly electricity prices. Create one at developer.tibber.com. The field still shows when the price source is a price entity — not needed then, so leave it empty. |
| Price sensor (Nord Pool or similar) | — (required with the price-entity source) | A sensor publishing the current electricity price, read instead of Tibber. |
| Weather forecast | — (required) | A weather entity supplying outdoor temperature, wind and rain for the next 24 hours. The optimizer plans ahead, so a forecast is not optional. |
2 · Optional sensors
Every picker on this second screen is optional; skip any you do not have. Without a sensor the optimizer uses its model, or leaves the one feature that needs the sensor dormant.
| Setting | Default | What it means |
|---|---|---|
| Indoor temperature sensor | none | The real room temperature. Without it the optimizer trusts its own model, which drifts over time — this is the sensor worth finding first. |
| Outdoor temperature sensor | none | A local thermometer beats the forecast for the current hour. |
| Heat pump on/off switch | none | A switch the optimizer may turn off during expensive hours. Without it — and without the ECL110 or frequency-control paths — the plan is published on sensors for your own automations to act on (worked examples). |
| Solar radiation sensor | none | Irradiance in W/m². Lets the plan skip heating before a sunny afternoon. |
| Solar irradiance source | Weather entity | Weather entity reads irradiance from your weather integration, which often does not publish any. Open-Meteo fetches a free forecast for the location below; no account needed. |
| Solar irradiance location | your Home Assistant home location | The coordinate Open-Meteo is asked about. Only used when the source is Open-Meteo. |
| Floor heating return temperature sensor | none | Water coming back from the floor loops. Used to gauge how much heat the slab is holding. |
| Lower floor temperature sensor | none | Two-zone houses only. Without it the lower zone is modelled from the main room sensor and labelled as modelled on the plan chart; a repair notice says so. |
| Hot water tank temperature sensor | none | Recommended. Lets a manual hot-water boost reset the anti-legionella timer, and unlocks the learned draw quantiles. Without one, a disinfection cycle the plan commands resets the countdown but is recorded as an attempt rather than a verified cycle, and a note in Repairs says the cycle cannot be verified. |
| Buffer tank temperature sensor | none | When set, the tank's cooling rate is learned instead of assumed. |
| Heat pump operating mode | none | The pump's own mode selector — cooling, heating, hot water, or a combination of two. Read only unless Pump duty control is set to Control. Left empty, the optimizer assumes the pump can do everything. |
| Defrosting | none | On while the pump reverses to melt frost off the outdoor coil. A sample of defrost activity, not a stopwatch — many pumps are only polled every few minutes. |
| Pump online | none | Strongly recommended for a cloud-connected pump. On while the pump is actually reachable, which a stale cloud republish cannot tell you on its own. |
| Fault alarm | none | On while the pump is reporting a fault. Only whether there is a fault is used, never the code itself. |
The heat-curve settings (the Danfoss ECL110 MQTT topics and the offset entity) are not asked during setup. Questions only owners of such a controller can answer do not belong on everyone's first screen, so they live on their own options page, where both MQTT topics ship empty and nothing is published or subscribed until a topic is set (see ecl110.md); an install without an ECL110 never touches the topics.
3 · The finish menu — Finish setup now?
After the optional sensors the flow asks Finish setup now? with three answers, drawn in the diagram above: Quick setup (recommended), Continue setup and Finish setup now. Quick setup and its pre-fill return to this menu; Continue setup runs the screens numbered 4 to 7 below; Finish setup now goes to the review. Nothing else on this menu has fields of its own.
The Quick setup screen
Quick setup (recommended) asks the whole house on one page: five yes/no questions, the two wood-tank probes, and the six building questions from Describe your building. What each answer means is in setup.md.
| Setting | Default | What it means |
|---|---|---|
| Two-zone house | off | Two separately heated floors, balanced against each other. |
| Buffer tank | off | A tank between the pump and the heating circuits large enough to store heat (recorded as 500 L). |
| Hot water tank | on | The pump keeps a domestic hot water tank. Off removes hot water from the plan. |
| Wood furnace | off | A wood furnace heats the same water loop. |
| Wood buffer tank | off | A second tank the wood furnace heats. |
| Wood tank top sensor (optional) | none | With the bottom sensor, says how much a fire has left. |
| Wood tank bottom sensor (optional) | none | See the top sensor. Both are needed for the remaining-energy estimate. |
| What the house is built from | Timber frame on a concrete slab | As on Describe your building. |
| Roughly when it was built | 1980–2005 | As above. |
| Foundation | Slab on ground | As above. |
| Heated floor area | 140 m² | As above. |
| Upper floor heating | Radiators | As above. |
| Lower floor heating | Floor heating | As above. |
The Pre-fill from a heat pump device screen
After Quick setup, and on the full path when the offer is switched on, this screen reads the heat pump's own entities. The first submit names the device; the second shows what its entities suggest, as ordinary fields you can edit or clear. Nothing is written until that second submit, and leaving the device empty skips the screen. Where each suggestion comes from is listed under Pre-fill from a heat pump device.
| Setting | Default | What it means |
|---|---|---|
| Heat pump device | none | The pump's device. Leave it empty to skip. |
| Highest tank temperature to charge to | read from the device | The pump's own hot water setpoint. |
| Anti-legionella temperature | read from the device | The pump's anti-legionella setpoint. |
| Hot water temperature you need | read from the device | The pump's economy hot water setpoint. |
| When you need hot water | read from the device | The pump's hot water schedule. Keeping it turns hot water planning on. |
| Anti-legionella interval | read from the device | The pump's anti-legionella schedule. |
| Pump's own night-mode schedule | read from the device | When the pump limits itself to its quiet mode. |
| Heat pump max power (kW) | read from the device | The unit's capacity divided by the nominal COP. |
| What that set-point entity expects | read from the device | Flow temperature when the pump runs on water temperature control. |
| What the control entity expects | read from the device | The same, for a mixing valve, only where the two-zone model is configured. |
| Outdoor temperature sensor | read from the device | Suggested only while the slot is empty. |
| Hot water tank temperature sensor | read from the device | Suggested only while the slot is empty. |
| Supply (flow) water temperature | read from the device | Suggested only while the slot is empty. |
| Return water temperature | read from the device | Suggested only while the slot is empty. |
| Actual frequency sensor (recommended for control) | read from the device | Suggested only while the slot is empty. |
| Capacity limited (night mode) | read from the device | Suggested only while the slot is empty. |
| After saving | Menu | The options page's own navigation control, shown on this form too; setup continues to the finish menu whatever it says. |
4 · Temperature Settings
The gap between your target and your minimum is what makes savings possible: the wider it is, the further the house may coast through an expensive hour.
| Setting | Default | Range | What it means |
|---|---|---|---|
| Target indoor temperature | 21.0 °C | 15–28, 0.5 steps | What you actually want. The optimizer aims here and only drifts to avoid expensive hours. |
| Coldest acceptable temperature | 19.0 °C | 14–25 | The coldest the plan will take the house. Priced, not fenced (see how it works), but firm at any real price. |
| Warmest acceptable temperature | 23.0 °C | 18–28 | A limit on pre-heating during cheap hours, never a target. Priced the same way; free solar gain can still carry a room past it. |
| Daytime comfort temperature | 21.0 °C | 16–26 | Preferred temperature during waking hours. |
| Night-time comfort temperature | 19.5 °C | 15–24 | Preferred temperature overnight. A degree or two lower saves money and usually sleeps better. |
| Day starts at | 07 | 00–23 | Hour the daytime temperature takes over. |
| Day ends at | 22 | 01–24 | Hour the night temperature takes over. Must be after the start; 24 keeps the daytime temperature until midnight. |
| Weekend daytime / night comfort | same as weekday | same ranges | Saturday and Sunday use this pair. Leave them at the weekday values if you do not want a weekend schedule. |
| Holiday daytime / night comfort | same as weekday | same ranges | Used on days the holiday-profile calendar is on. Away setback still wins if away is active. |
The form refuses four combinations that would leave the plan permanently in violation: a minimum above the target, a maximum below it, a night temperature above the day temperature, and a day window that never opens (start at or after end). The same checks run on the options page later.
5 · Your building — two ways to answer
Describe your building
Describe my building (recommended) opens this screen. Six questions with answers a homeowner knows, from which the thermal masses, the heat-loss coefficient and the slab parameters are derived. These are starting values; the self-learning model corrects them from how the house actually behaves, so they need not be exact.
| Setting | Default | Choices / range | What it means |
|---|---|---|---|
| What the house is built from | Timber frame on a concrete slab | Timber frame, crawl space or suspended floor · Timber frame on a concrete slab · Concrete or brick on a slab · Stone or masonry | Heavy materials inside the insulation store heat — which is exactly what lets the optimizer buy heat cheaply and spend it later. |
| Roughly when it was built | 1980–2005 | Before 1960 · 1960–1980 · 1980–2005 · After 2005 · Low-energy or passive house | A proxy for insulation standard, and a far better starting point than one global default. |
| Foundation | Slab on ground | Slab on ground · Crawl space · Heated basement | A crawl space adds heat loss; a heated basement adds both loss area and mass. |
| Heated floor area | 140 m² | 20–1000, 5 steps | Everything is scaled by this, so it is the number worth getting closest to right. |
| Upper floor heating | Radiators | Radiators · Floor heating | Radiators respond in minutes, floor heating in hours. This sets how far ahead heat can usefully be shifted. |
| Lower floor heating | Floor heating | Radiators · Floor heating | A heated slab is a large store that gets actively charged, which makes pre-heating both more valuable and more necessary. |
Your heat pump
Then three numbers off the heat pump's nameplate:
| Setting | Default | Range | What it means |
|---|---|---|---|
| Heat pump nominal COP | 3.5 | 1.5–6.0, 0.1 steps | Units of heat per unit of electricity under normal conditions. 3 to 4 is typical for air-to-water, 4 to 5 for ground source. |
| Heat pump max power | 5.0 kW | 1–20, 0.5 steps | Electrical input at full output. Caps how much cheap electricity can be stored per hour. |
| Heat pump min power | 1.0 kW | 0–10, 0.5 steps | The lowest input the pump can hold without cycling. Must not exceed the maximum. |
A pump that cannot run below its min power at all, only on or off, is declared on Thermal model (expert) as Compressor runs below min power: No: on/off; otherwise the plan may book steps below the minimum as averages the pump would reach by modulating.
That is the whole questionnaire path — the two-zone and solar pages are skipped deliberately. Their fields, once written, are what switches the two-zone model on, and a fresh install should not be given a two-zone model it did not ask for. If your house does have two independently modelled floors, turn it on afterwards on Advanced settings → Thermal model (expert).
Thermal Model & Optimization
Enter thermal values directly opens this screen. It is for someone holding a real energy declaration, and asks the model's own numbers:
| Setting | Default | Range | What it means |
|---|---|---|---|
| House thermal mass | 10.0 kWh/°C | 0.5–80, 0.5 steps | Heat stored per degree by the room air, furnishings and light fabric — roughly 0.02 kWh/°C per m² of heated area for timber, 0.05 or more for stone. Heavy floors are counted under the slab mass below, so this is not the whole building. |
| Heat loss coefficient | 0.15 kW/°C | 0.01–1.0, 0.01 steps | Heat lost per degree of indoor-outdoor difference. 0.25 kW/°C across a 20-degree gap means about 5 kW of demand. |
| Slab floor thermal mass | 5.0 kWh/°C | 0.1–60, 0.5 steps | Heat stored per degree by whatever the heat is delivered through: the slab of a floor-heated house — the buffer that lets it be switched off through a price peak — or, with radiators, the water and steel of the radiator circuit, which is far smaller (about 0.2 kWh/°C for 100 m²). |
| Slab-to-room heat transfer | 0.8 kW/°C | 0.02–5.0, 0.1 steps | How fast that store gives its heat to the room. Lower means a sluggish floor that must be charged further in advance; radiators sit far higher. |
| Heat pump nominal COP | 3.5 | 1.5–6.0 | As above. |
| Heat pump max power | 5.0 kW | 1–20 | As above. |
| Heat pump min power | 1.0 kW | 0–10 | As above. |
| Heat pump COP loss at max power | 0 | 0–0.5, 0.01 steps | The share of efficiency lost running at max power rather than at min power, as a fraction (0.1 = 10 %). Larger heat flows need larger temperature differences across the heat exchangers, so the compressor's COP falls with its power; the model prices that as a linear fall across the modulation band, on the space-heating and the hot-water schedules alike. 0 leaves power out of the COP entirely, which is the default because no install without a heat meter can measure the slope; typical air-to-water units lose 0.05 to 0.15. The value must stay below band / (band + max power), band being max minus min power (0.44 for a 1–5 kW pump, 0.17 for a 4–5 kW one): at or above it more power would deliver less heat at the top of the band, so the options page refuses it and a stored one is read as 0. |
| Recalculate every | 30 min | 10–120, 5 steps | How often the plan is re-solved against fresh prices and weather. |
| How hard to chase low prices | 1.0 | 0.1–10, 0.1 steps | Higher moves more heating into cheap hours, at the cost of more temperature swing. |
| How strictly to hold the temperature | 5.0 | 0.1–20, 0.1 steps | The counterweight. Around 5 lets the house drift freely inside your allowed range; 10 keeps it noticeably closer to target; 20 or more behaves like an ordinary thermostat. |
Two-Zone & Solar Configuration
The direct path continues on the two-zone and solar screen:
| Setting | Default | Range | What it means |
|---|---|---|---|
| The house has two zones (two floors heated separately) | unticked | on/off | On: the two-zone model runs and the zone fields below apply. Off: the house is modelled as one zone whatever the fields say. An untouched screen answers no. |
| Upper floor thermal mass | 3.0 kWh/°C | 0.25–60 | Heat stored in the upper zone. Usually much lower than a heated slab, so the zone reacts faster. |
| Lower floor thermal mass | 8.0 kWh/°C | 0.25–60 | Heat stored in the lower zone. |
| Upper floor heat loss | 0.08 kW/°C | 0.001–1.0 | The upper zone's own loss coefficient. |
| Lower floor heat loss | 0.07 kW/°C | 0.001–1.0 | The lower zone's own loss coefficient. |
| Inter-zone heat transfer | 0.5 kW/°C | 0.01–3.0 | How much heat drifts between floors. Higher suits an open stairwell. |
| Share of heat going to radiators | 0.4 | 0.0–1.0, 0.05 steps | 0 sends everything to the slab, 1 everything to the radiators. |
| Upper floor area ratio | 0.5 | 0.1–0.9 | The share of floor area upstairs. 0.5 means two equal floors. |
| Buffer tank size | 35 L | 10–1500, 5 steps | The tank between the pump and the heating circuits. Below 100 L it is modelled but not planned around as a store. |
| Window area facing the sun | 10 m² | 0.01–50, 0.5 steps | Glazing that gets direct sun, used to predict free solar heat. |
| Solar orientation factor | 0.7 | 0.0–1.0 | How well the glazing faces the sun over a day. 1.0 suits mostly south-facing windows. |
| How much sunlight the windows let through | 0.7 | 0.1–1.0 | The glazing's solar heat gain coefficient. About 0.6 for modern triple glazing. |
The tick box at the top decides the two-zone model; the zone fields only apply while it is on. The questionnaire path skips this screen, so a fresh install is single-zone until you turn two-zone on.
6 · Hot water — Domestic Hot Water (DHW) Configuration
Tell the optimizer when you actually need hot water. It then guarantees a usable tank temperature during those periods and heats in the cheapest hours beforehand. Outside them the tank is meant to cool — that is where much of the saving comes from.
| Setting | Default | Range | What it means |
|---|---|---|---|
| The house has a hot water tank | unticked, or your Quick setup answer | on/off | On: hot water is planned and the tank charged. Leave it off unless the heat pump really heats a tank; the other fields only apply while it is on. |
| Hot water tank size | 200 L | 50–1500, 10 steps | A larger tank stores more cheap electricity and can skip more expensive hours. |
| Highest tank temperature to charge to | 55 °C | 40–65 | An upper limit on charging, not a target. The tank is only filled this high when storing extra cheap heat pays. |
| Hot water temperature you need | 45 °C | 35–55 | Guaranteed inside the time frames below. Must be at least 5 °C below the charge limit, or the plan sits in permanent slight violation. |
| Hot water used per day | 150 L/day | 50–1500 | Roughly your household's daily draw. Used to size what to store before each period. |
| Tank heat loss | 0.3 °C/h | 0.05–3.0, 0.05 steps | Standby cooling at 45 °C in a 20 °C room. A starting point only: the real rate is measured and refined. |
| Only guarantee hot water at set times | on | on/off | Off keeps the tank hot around the clock, which costs noticeably more. |
| When you need hot water | 06:00-08:30, 17:00-22:00 |
24-hour times, comma separated | The tank is heated in the cheapest hours before each period. Each period must be at least 15 minutes — one planning step; a shorter one can fall between two steps and never take effect. Leave empty to let the integration learn your habits from actual usage. |
| Let the tank cool to | 20 °C | 10–55 | How cold the tank may get between periods. The default is roughly room temperature — nothing is spent at all. |
| Run an anti-legionella cycle | on | on/off | Because the tank spends long stretches cool, it is periodically heated hot enough to kill legionella. Strongly recommended. |
| Anti-legionella temperature | 60 °C | 55–70 | The usual recommendation is 60 °C. Check what applies where you live. This applies only while a cycle is running: if it is above the charge limit above, the tank goes above that limit for the cycle and at no other time. |
| Anti-legionella interval | 7 days | 1–30 | Placed in the cheapest hour before each deadline. |
Per-weekday windows are an options-page feature (see
Hot water under Changing settings later); the setup wizard's
single field takes the same grammar, including day selectors such as
weekdays 06:00-08:30, weekend 08:00-09:30.
7 · Weather Sensitivity Parameters
| Setting | Default | Range | What it means |
|---|---|---|---|
| Wind sensitivity | 0.03 | 0.0–0.5, 0.01 steps | Extra heat loss per m/s of wind — 0.03 means 3 % more loss per m/s. Raise it if the house noticeably cools on windy days. |
| Rain sensitivity | 1.15 | 1.0–1.5, 0.01 steps | Loss multiplier while it is raining. 1.0 means rain makes no difference. |
Saving this page moves to the review screen.
The review screen — Your system, as configured
Every route ends here: a read-only picture of what you described, the zones, the tanks and every sensor slot with what is assigned to it. Confirming it is what creates the entry. All 82 entities appear at once and the first plan is solved within one optimization interval.
Reauthenticate Tibber
When Tibber refuses the stored token, Home Assistant asks you to re-authenticate the integration under Settings → Devices & services, which opens this screen. Enter a valid token and price updates resume.
| Setting | Default | What it means |
|---|---|---|
| Tibber API token | none | A new token from developer.tibber.com. |
Changing settings later
Settings → Devices & services → Heat Pump Optimizer → Configure.
There are 24 pages: eight on the first menu, and sixteen more behind Advanced settings. One of the eight — Your system, as configured — is read-only, and the last advanced page, Reset to factory defaults, is an action behind a confirmation rather than settings. Each page saves on its own, so changing one setting never touches another page's values. Every page also ends with one shared navigation control, described once here rather than twenty-three times below:
| Setting | Default | Choices | What it means |
|---|---|---|---|
| After saving | Menu | Menu / Close | Saving writes through immediately; this chooses where the dialog goes next. Menu returns to the section menu — the advanced menu on the advanced pages — so you can change settings on several pages without reopening the dialog. Close saves and closes. The choice itself is never stored. |
| First menu | What lives there |
|---|---|
| Your system, as configured | A read-only picture of your setup, drawn from the same description the card's setup tab uses |
| Comfort and temperatures | The temperature band, the heating day, weekend and holiday profiles, and the mold guard |
| Hot water | Time frames, the temperatures the tank is held to, and anti-legionella |
| Savings vs comfort | The weights, the interval, and what a compressor start costs |
| Grid peak tariff | The monthly capacity charge and the clock it is measured on |
| Away and holiday mode | An occupancy source, a holiday calendar, and the two setback temperatures |
| Pre-fill from a heat pump device | Suggested values read from the pump's own device entities or a GCHV pump's Modbus package |
| Quick setup | The one-page house questions from initial setup, pre-filled with this entry's own answers: change one and submit to re-derive the thermal model; untouched, nothing is written |
| Advanced settings | What lives there |
|---|---|
| Sensors and entities | Price source, weather, room and tank sensors, the on/off switch |
| Power and solar sensors | Irradiance, the three power/energy meters, compressor frequency |
| Heat pump telemetry | Mode, defrost, online, fault |
| Heating system and heat storage | Mixing valve, buffer tank, wood furnace, the heating circulation pump |
| Building type and emitters | The questionnaire again, plus windows and weather sensitivity |
| Thermal model (expert) | The raw single-zone masses, losses, COP and power limits |
| Two-zone model | The two-zone switch and the per-floor numbers |
| Hot water tank and inlet | Volume, daily draw, inlet water, greywater, disinfection extras |
| Hot water circulation | The DHW loop pump and its lead time |
| Solar panels | Array size, efficiency, export compensation |
| Self-learning and diagnostics | The staleness watchdog and the three core learners |
| Advanced learning features | Outage recovery, weather/plant learners, curve learning |
| Fuse and peak guards | Main fuse, the fuse cap, the live peak guard, the heat pump's silent mode |
| Transfer fees and contract | DSO product, per-kWh fees, the fixed-contract comparison |
| Heat curve control | MQTT topics, the offset entity and displace limits |
| Reset to factory defaults | The settings, the learned values, or both, back to a fresh installation; undone by restore_learned_snapshot |
Your system, as configured
No fields. It renders what the optimizer believes your system is: the zones, the tanks, the valve, and every sensor slot with what is assigned to it. Empty slots are shown as empty on purpose — the point is to reveal what is missing.
Comfort and temperatures
The seven weekday fields are those of the Temperature Settings screen, with the same defaults, ranges and cross-checks. The weekend and holiday schedules live here too, and each of their fields starts as a copy of the weekday value it mirrors; leave every one at that default and weekends and holidays simply follow the weekday plan.
| Setting | Default | Range | What it means |
|---|---|---|---|
| Target indoor temperature | 21.0 °C | 15–28, 0.5 steps | What you actually want. The optimizer aims here and only drifts to avoid expensive hours. |
| Coldest acceptable temperature | 19.0 °C | 14–25 | The coldest the plan will take the house. Priced, not fenced, but firm at any real price. |
| Warmest acceptable temperature | 23.0 °C | 18–28 | A limit on pre-heating during cheap hours, never a target. |
| Daytime comfort temperature | 21.0 °C | 16–26 | Preferred temperature during waking hours. |
| Night-time comfort temperature | 19.5 °C | 15–24 | Preferred temperature overnight. |
| Day starts at | 07 | 00–23 | Hour the daytime temperature takes over. |
| Day ends at | 22 | 01–24 | Hour the night temperature takes over. |
| Weekend daytime comfort | weekday daytime value | 16–26, 0.5 steps | Preferred temperature during weekend waking hours. |
| Weekend night-time comfort | weekday night-time value | 15–24, 0.5 steps | Preferred temperature overnight on Saturday and Sunday. |
| Weekend day starts at | the weekday start | 00–23 | Hour the weekend daytime temperature takes over. |
| Weekend day ends at | the weekday end | 01–24 | Hour the weekend night temperature takes over. 24 keeps the daytime temperature until midnight. |
| Holiday daytime comfort | weekday daytime value | 16–26, 0.5 steps | Daytime comfort on days the holiday-profile calendar is on. Away setback still wins if away is active. |
| Holiday night-time comfort | weekday night-time value | 15–24, 0.5 steps | Overnight comfort on holiday-calendar days. |
| Holiday day starts at | the weekday start | 00–23 | Hour the holiday daytime temperature takes over. |
| Holiday day ends at | the weekday end | 01–24 | Hour the holiday night temperature takes over. |
Four mold-guard fields complete the page:
| Setting | Default | Range | What it means |
|---|---|---|---|
| Keep cold surfaces below mold humidity | off | on/off | The coldest spot in the house sits well below room temperature, and mold starts where its surface humidity stays above 80 %. With this on, the plan will not coast below the temperature that keeps that spot safe. It never heats past your comfort target. |
| Indoor humidity sensor | none | a humidity sensor |
Required for the guard: without a live reading it stays off regardless of the switch. |
| Worst thermal bridge factor (fRsi) | 0.75 | 0.3–0.98, 0.01 steps | How cold your worst surface gets: surface = outdoor + fRsi × (room − outdoor). 0.75 is the Swedish building-code guidance; lower means a colder spot and a more cautious guard. |
| Mold floor breach warning margin | 0.5 °C | 0–5 °C, 0.1 steps | How far below the mold floor the measured room may fall before the Mold Floor Breach binary sensor turns on. The warning exists because a hot-water-only mode cannot hold the floor, so the room can free-cool below it while the plan still promises the floor. |
Hot water
The first-menu page is the schedule and the temperatures the tank is held to. Tank size, inlet water and the circulation pumps live on their own advanced pages.
| Setting | Default | Range | What it means |
|---|---|---|---|
| Only guarantee hot water at set times | on | on/off | Off keeps the tank hot around the clock, which costs noticeably more. |
| When you need hot water | 06:00-08:30, 17:00-22:00 |
24-hour times, comma separated | The tank is heated in the cheapest hours before each period. Each period must be at least 15 minutes. Leave empty to let the integration learn your habits from actual usage. |
| Holiday hot-water windows | empty | same grammar | Used on days the holiday calendar is on, instead of weekday/weekend. Leave empty to keep the ordinary schedule. |
| Customize by weekday | off | on/off | Reveals seven fields, one per weekday, below the ordinary ones. |
| Monday | empty | 24-hour times, comma separated | Hot-water times for Mondays only. Leave empty to inherit. |
| Tuesday | empty | 24-hour times, comma separated | Hot-water times for Tuesdays only. Leave empty to inherit. |
| Wednesday | empty | 24-hour times, comma separated | Hot-water times for Wednesdays only. Leave empty to inherit. |
| Thursday | empty | 24-hour times, comma separated | Hot-water times for Thursdays only. Leave empty to inherit. |
| Friday | empty | 24-hour times, comma separated | Hot-water times for Fridays only. Leave empty to inherit. |
| Saturday | empty | 24-hour times, comma separated | Hot-water times for Saturdays only. Leave empty to inherit. |
| Sunday | empty | 24-hour times, comma separated | Hot-water times for Sundays only. Leave empty to inherit. |
Per-weekday windows, and how the layers stack. One schedule rarely fits
a week with early workdays, a late Saturday and a Sunday that starts at
noon. You can already type day selectors into the ordinary field
(weekdays 06:00-08:30, weekend 08:00-09:30); Customize by weekday is
the form version — switch it on, save, reopen the page, and seven fields
appear, each holding one weekday's times in the same comma-separated
format (12:00-24:00 for "nothing until noon"). An empty field does not
mean "no hot water that day"; it means inherit.
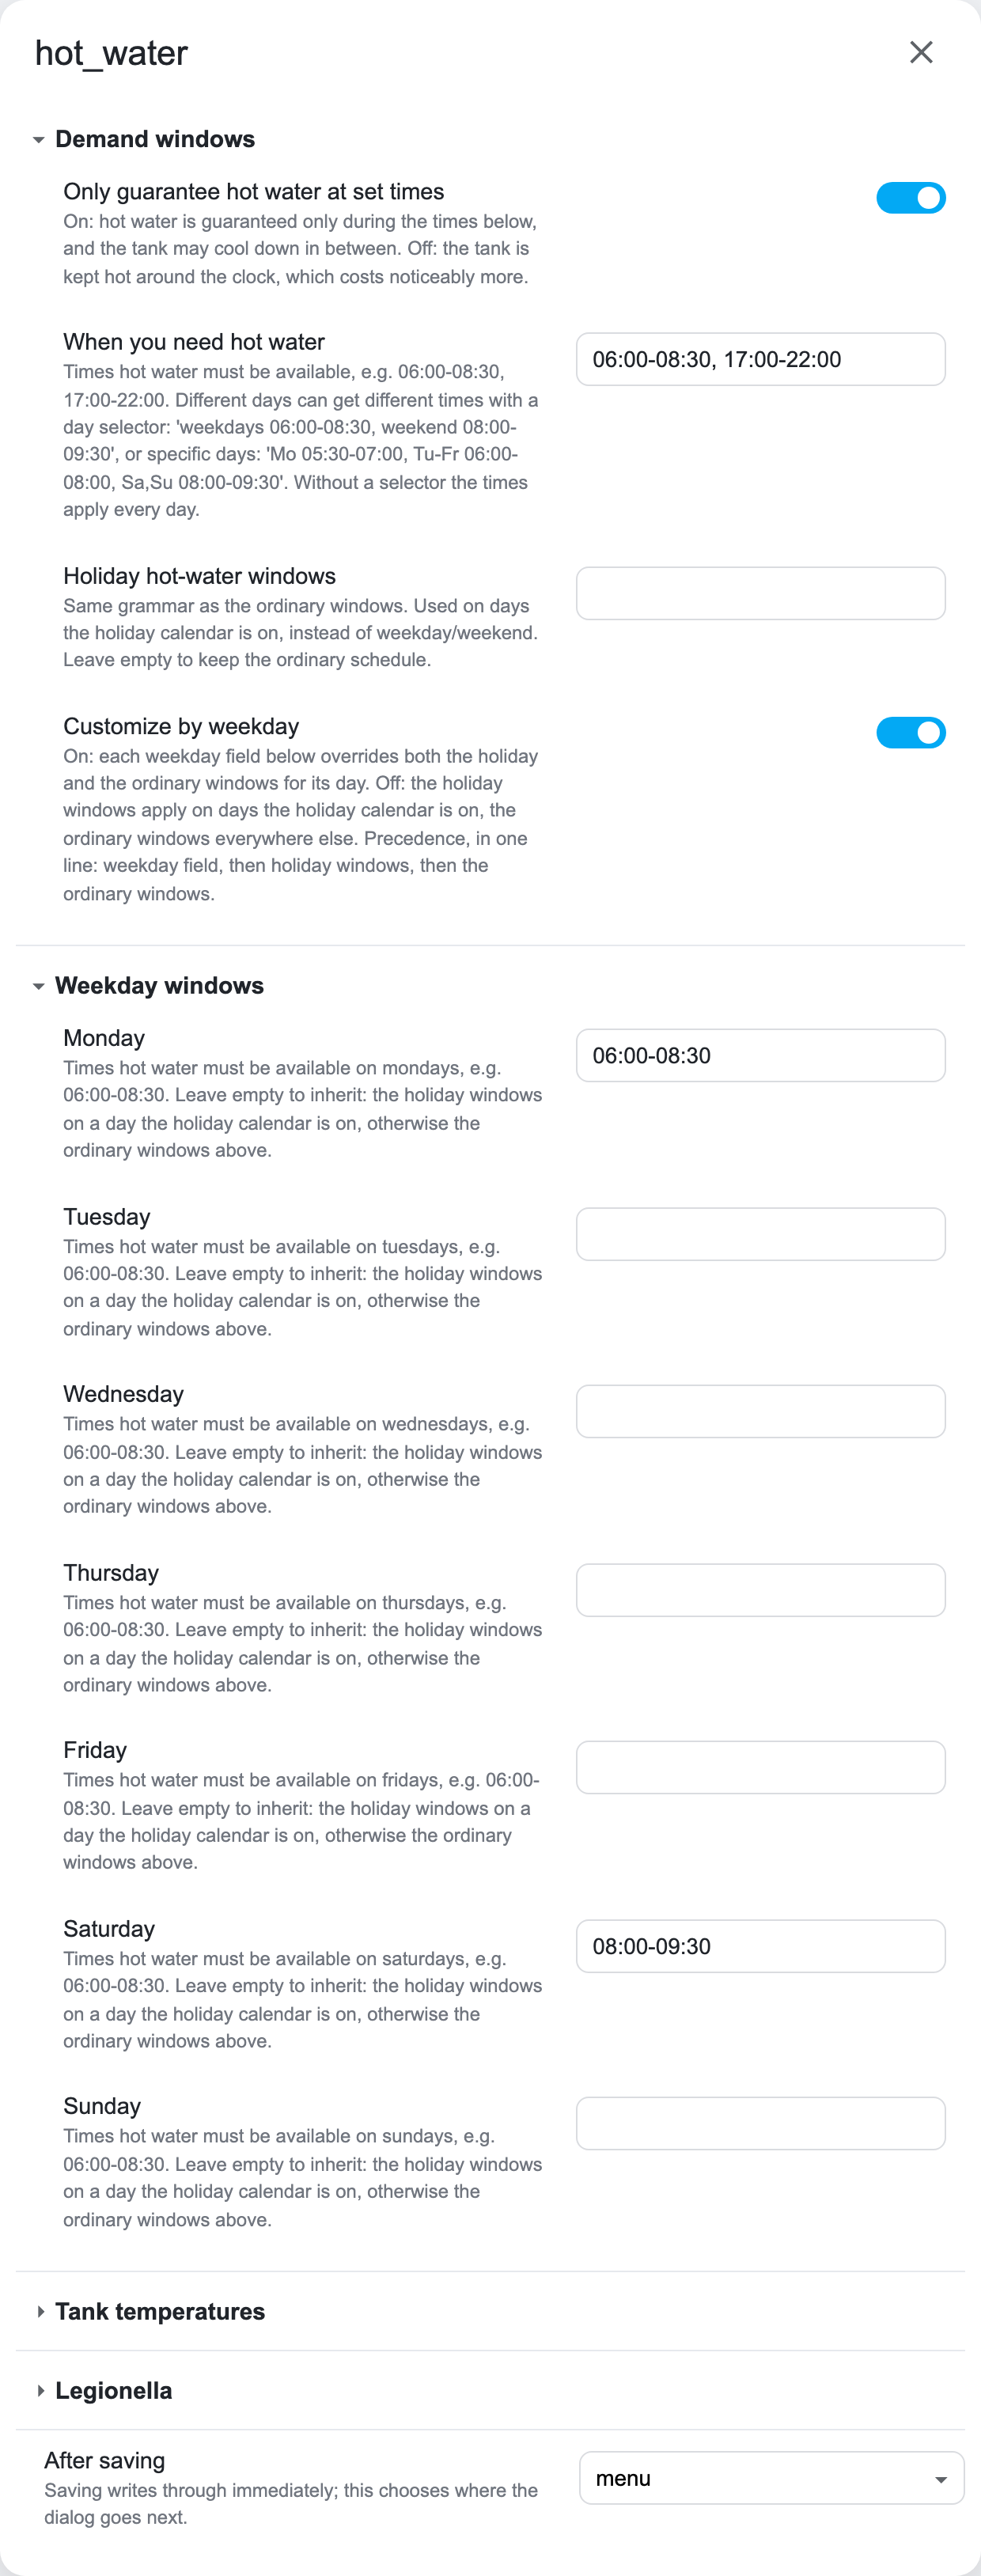
The page as the flow renders it, two weekdays answered and the rest inheriting. A generated render of the integration's own form definitions and English texts — the same kind of picture setup.md uses, of this options page.
The layers resolve in a fixed order, per day:
- A weekday field that has times wins for its weekday — including over the holiday windows. If you say Sundays are always the same, a Sunday that happens to be a public holiday keeps your Sunday schedule.
- Otherwise, on a day the holiday calendar is on, the holiday windows apply.
- Otherwise the ordinary windows — flat, or with their own day selectors — apply.
Switching Customize by weekday off suspends the weekday fields without erasing them: the holiday/ordinary schedule runs, and switching it back on restores what you had typed. Each field takes plain times only — day selectors belong in the ordinary field, and the form refuses one here because the field already names its day.
The dashboard card follows the same resolution. Its plan tab's hot-water band is drawn from the schedule the plan actually resolved against — with weekday fields in force, from their folded result — while the what-if editor still edits the ordinary windows: editing those is editing the default layer, and a weekday field set for that day keeps winning over an edit made in the card.
The temperatures the schedule holds the tank to:
| Setting | Default | Range | What it means |
|---|---|---|---|
| Hot water temperature you need | 45 °C | 35–55 | Guaranteed inside the time frames. Must be at least 5 °C below the charge limit, or the plan sits in permanent slight violation. |
| Let the tank cool to | 20 °C | 10–55 | How cold the tank may get between periods. The default is roughly room temperature — nothing is spent at all. |
| Highest tank temperature to charge to | 55 °C | 40–65 | An upper limit on charging, not a target. The tank is only filled this high when storing extra cheap heat pays. |
| Heat pump DHW set-point entity | none | number / input_number / climate / water_heater |
Optional. The pump's own DHW set-point, used to notice when it cannot be read and, with Pump duty control at Control, written with the hot water set-point above. |
| Run an anti-legionella cycle | on | on/off | Because the tank spends long stretches cool, it is periodically heated hot enough to kill legionella. Strongly recommended. |
| Anti-legionella temperature | 60 °C | 55–70 | The usual recommendation is 60 °C. Check what applies where you live. |
| Anti-legionella interval | 7 days | 1–30 | Placed in the cheapest hour before each deadline. |
Savings vs comfort
The trade-off between a cheap bill and a rock-steady temperature. If the house feels cool during price peaks, raise How strictly to hold the temperature or raise your minimum temperature; both work, and both trade savings for warmth.
| Setting | Default | Range | What it means |
|---|---|---|---|
| How hard to chase low prices | 1.0 | 0.1–10 | Higher moves more heating into cheap hours and allows more swing. |
| How strictly to hold the temperature | 5.0 | 0.1–20 | The most effective knob you have. It is weighed against the range you allow, so widening that range makes the optimizer bolder. |
| Recalculate every | 30 min | 10–120, 5 steps | More often reacts quicker and does more work. |
| Cost of one compressor start | 0.0 | 0–10, 0.05 steps | In the same currency as your prices. Discourages plans that switch on and off repeatedly. The Compressor Starts sensor counts realised starts and needs a power meter; the plan's own projected start count is not published on any entity. |
| Caution with guessed prices | 0.0 | 0.0–2.0, 0.05 steps | Beyond the published horizon prices come from your learned daily shape. This adds a premium proportional to how wrong those guesses have tended to be. 0 trusts them at face value. |
| Hold a safety margin where the model is unsure | off | on/off | Raises the comfort floor by the model's own expected error at that horizon, capped at 0.8 °C and shrinking as accuracy improves. |
| Compressor replacement cost | 0 | 0–100 000, 100 steps | What a compressor swap costs including labour, in your price currency. Divided by the rated starts below it prices each realised start. 0 keeps the start counter pure observation. |
| Compressor rated starts | 100 000 | 1 000–1 000 000 | What the manufacturer rates the compressor for. |
| Let realised wear tune the cycling cost | off | on/off | Makes the wear price a floor under the cycling cost above. The only insight feature that changes plans. |
| Refresh price tiles after each solve | off | on/off | Prices one what-if tile after each scheduled optimization — the comfort schedule one degree lower, one higher, power capped at 75 %, in rotation, each averaged over 30 days. Off by default because each tile is a full extra solve. |
Grid peak tariff
The monthly capacity charge. Many grid companies bill on your highest hours, which means stacking hot water and space heating into the same cheap hour can cost more than it saves. Transfer fees, the main fuse and the live peak guard are on their own advanced pages.
| Setting | Default | Range | What it means |
|---|---|---|---|
| My grid bill has a capacity charge | off | on/off | Adds the monthly power-peak fee to the objective, so flattening peaks is worth actual money. |
| Capacity charge per kW per month | 45 | 0–500 | Take it from your grid invoice; it varies a lot between companies. |
| Number of peak hours averaged | 3 | 1–10 | Most Swedish tariffs average the three highest hours of the month. |
| Measurement window | hourly | 15 minutes / 1 hour | Swedish DSOs move to 15-minute settlement through 2026–27. Pick 15 when your bill averages the highest 15-minute windows; 60 keeps the older hourly clock. Hourly prices are smeared evenly across the four quarters — a 15-minute sauna spike is billed in full only when the window is 15. |
| Months the capacity tariff applies | empty | e.g. Nov-Mar |
Empty means every month. Outside these months a peak contributes nothing, and the plan knows it. |
| Peak hours | empty | e.g. 07:00-19:00 |
Empty means every hour counts in full. Outside these hours a peak counts at the factor below. |
| Weekends are off-peak | off | on/off | Many tariffs only bill weekday peaks. |
| What off-peak hours count at | 1.0 | 0.0–1.0, 0.05 steps | 1.0 treats every hour alike. 0.5 is the common half-rate night; 0 makes off-peak peaks free. |
| Peaks on different days | on | on/off | Most Swedish tariffs count the highest hour of each of three different days, so a cold morning with three high hours is one peak, not three. Turn off only if your invoice averages the highest hours regardless of day. |
Away and holiday mode
This page has four fields. The Away switch and the Away Expected Return datetime are their own entities, not options — they are on the integration's device page and on the card, not here.
| Setting | Default | Range | What it means |
|---|---|---|---|
| Away indicator | none | person, device_tracker, calendar, binary_sensor |
Polarity is handled for you: a person being not home still means away when the Plan-page toggle is off. |
| Holiday-profile calendar | none | a calendar |
When this calendar is on, holiday comfort and holiday hot-water windows replace the weekday/weekend pair for that day. Away setback still wins if away is active. |
| Temperature while away | 16.0 °C | 5–21, 0.5 steps | Low enough to save, high enough to protect the house and its plumbing. With the mold guard on, the mold-safe temperature outranks it and can hold the room near the comfort target in a humid house, so away then saves little space-heating energy (Away and the mold guard). |
| Hot water minimum while away | 20.0 °C | 10–55 | The anti-legionella cycle still runs, timed to finish before you get back. |
Quick setup
The one-page house questions of the Quick setup screen, pre-filled with this entry's own recorded answers. Change an answer and submit, and the thermal model is re-derived from the questionnaire; submit without changing anything and nothing is written. The device pre-fill is not offered here: an existing entry's sensor slots are already answered, and that read stays on Pre-fill from a heat pump device.
Pre-fill from a heat pump device
The pump keeps several of the answers the other pages ask for, and this page
reads them. Two sources reach them: the pump's own device — any integration
that publishes a heat pump device, with
tuya_heat_pump the reference — and,
for a Rotenso Windmi or another GCHV-built heat pump, that project's Modbus
package (docs/modbus/rotenso_windmi_gchv.yaml in the tuya_heat_pump
repository, generated by its tools/gen_gchv_package.py; neither file lives
in this repository).
It takes two submits. The first says where to read the pump from — either its own device, or the Modbus package's entity prefix; the second shows what that source suggests, as ordinary fields you can edit or clear, and saves what you keep. Nothing is written until that second submit, a field you clear is left as it was, and if nothing is found, nothing is written at all.
Both routes stay because they answer different installs. A Modbus YAML package
gives its sensors a unique id and no device, so only the prefix reaches them.
A pump integrated through tuya_heat_pump has a device and no package.
| Setting | Default | Range | What it means |
|---|---|---|---|
| Heat pump device (optional) | — | device | The pump's own device. Its entities are mapped to settings by a table derived from that integration's published definitions — not from a reading of your unit — so check the suggestions before saving. A device the integration has no table for is refused, and you can name a prefix instead. This pick is never stored. |
| Modbus package entity prefix | hp |
text | The start of the package's entity ids — hp for sensor.hp_outdoor_air_temperature. Used when no device is picked, and saved only when the package was found under it. |
| Offer this pre-fill at setup | off | on/off | When on, creating a new entry offers this page while you are setting up, if a heat-pump device that has been added to the install can fill any of these settings. Nothing is written until you submit the offered page, leaving the device empty skips it, and the wizard is unchanged while this is off. Stored, so it applies to every entry and survives a restart. |
What the second form can suggest, and where each value comes from:
| Suggested setting | Read from | How |
|---|---|---|
| Highest tank temperature to charge to | DHW normal setpoint (register 0194H) | register × 0.1 |
| Anti-legionella temperature | DHW anti-legionella setpoint (0195H) | register × 0.1 |
| Hot water temperature you need | DHW economic setpoint (0196H) | register × 0.1 |
| When you need hot water | DHW schedule start and stop (02C8H, 02C9H) | each register is hour × 256 + minute; only while the DHW schedule (02C7H) has a day set. Saving it turns hot water planning on. |
| Anti-legionella interval | Anti-legionella schedule days (02CAH) | 7 days divided by the number of days set, rounded down |
| Pump's own night-mode schedule | Night mode start and end (0206H, 0207H) | hour × 256 plus minute |
| Heat pump max power (kW) | Unit capacity (1006H) | the unit's thermal capacity divided by the nominal COP in force |
| What that set-point entity expects | Control mode (100DH) | flow when the unit runs on water temperature control |
| What the control entity expects | Control mode (100DH) | flow on water temperature control, and only where the two-zone model the building page requires for it is configured |
| Outdoor temperature sensor, Hot water tank temperature sensor, Supply (flow) water temperature, Return water temperature, Actual frequency sensor (recommended for control), Capacity limited (night mode) | the package's own sensors | suggested only while that slot is empty |
A register that is missing or unreadable suggests nothing, a value equal to the
one already in force is not suggested, and a value outside its field's own
range is left out rather than offered. The raw register sensors are found under
either spelling an install may hold, sensor.hp_gchv_r404_0194h or
sensor.hp_gchv_r404. The form also shows how many of the package's entities
were read, and the backup heater type register: any value but 7 means the pump
has electric heat of its own, which the heater slots on Heat pump telemetry
are there to watch. The same refusals as on the pages these settings live on
apply to what you save — a hot water minimum too close to its setpoint, a time
frame shorter than a planning step, a maximum power below the minimum.
Nothing about the house, its emitters or its thermal model can be read this way; those stay yours to describe.
The same page is offered during setup, when the pre-fill offer is switched on and a heat-pump device added to the install resolves through one of those sources: the wizard asks which device to read and shows the same suggestions, and what you keep lands in the new entry's own configuration. Leave the device empty to skip it.
Sensors and entities
Price, weather, room and tank sensors, and the on/off switch. Clearing a field genuinely clears it. Meters, solar irradiance and compressor frequency are on Power and solar sensors; mode / defrost / online / fault are on Heat pump telemetry.
| Setting | Default | Range | What it means |
|---|---|---|---|
| Electricity price source | Tibber | Tibber / Price entity | Tibber uses the API token. Entity reads a Home Assistant price sensor (Nord Pool, ENTSO-E, similar) with raw_today / raw_tomorrow. |
| Tibber API token | — (the setup value) | required when source is Tibber | Re-validated against Tibber whenever you change it. Not required for an entity source. |
| Price sensor | none | a price sensor | Required when the source is an entity. Typical attributes are raw_today and raw_tomorrow. |
| VAT multiplier | 1.0 | 0–2, 0.01 steps | Applied to entity-sourced prices as value × VAT + surcharge. 1.0 leaves the values unchanged; Tibber prices are used as delivered. |
| Surcharge per kWh | 0 | 0–2, 0.01 steps | Added on top after the multiplier, in the same currency as your prices. 0 leaves the values unchanged. |
| Weather forecast | — (the setup value) | required | The forecast source. |
| Indoor temperature sensor | the setup value | a temperature sensor | As on Optional sensors. Clearing it leaves the plan on its own model. |
| Outdoor temperature sensor | the setup value | a temperature sensor | As on Optional sensors. |
| Hot water tank temperature sensor | the setup value | a temperature sensor | As on Optional sensors. |
| Buffer tank temperature sensor | the setup value | a temperature sensor | As on Optional sensors. |
| Floor heating return temperature sensor | the setup value | a temperature sensor | As on Optional sensors. |
| Lower floor temperature sensor | the setup value | a temperature sensor | As on Optional sensors. Two-zone houses only. |
| Heat pump on/off switch | the setup value | a switch |
As on Optional sensors. |
| Space-heating set-point entity | none | number / input_number / climate |
Optional. Used to notice when the entity cannot be read. Written only with Pump duty control at Control, and then with the plan's own number (see below), never a recommended optimum. |
| What that set-point entity expects | Indoor temperature | Indoor temperature / Flow temperature / Return temperature | A declaration, not a write. Pointing an indoor target at a flow entity would command roughly 21 °C to something expecting 35–45 °C. Return temperature is a controller that takes the number as its return-water target (see Pump duty control). |
Minimum lift above the inlet water (flow_min_lift_k) |
5 K | 0.5–15 K, 0.5 steps | Shown when the unit above is Flow or Return temperature. The heating value at the plan's lowest power is the measured inlet water plus this (see Pump duty control). |
Heating flow ceiling (flow_heat_c) |
55 °C | 30–70 °C, 0.5 steps | Shown when the unit above is Flow or Return temperature. The heating value at full planned power, and the highest heating value written. A stored value at or below the 25 °C gate is read as 55 °C. |
Follow the planned power on the measured draw (space_setpoint_power_feedback) |
On | on / off | Shown when the unit above is Flow or Return temperature; acts only when a heat-pump power sensor is configured too. Closes the heating value on the measured draw (see Pump duty control). Off writes the inlet plus the lift. |
Controller's minimum set-point sensor (space_setpoint_low_limit_entity) |
none | a temperature sensor | Shown when the unit above is Flow or Return temperature. Optional: the lowest value the controller accepts for the set-point entity (a Luxtronik through ha-luxtronik-shi: “Temperature: return target minimum”, input 10104). Follow the planned power then never sends a value below it (see Pump duty control). Empty changes nothing. |
Controller's maximum set-point sensor (space_setpoint_high_limit_entity) |
none | a temperature sensor | Shown when the unit above is Flow or Return temperature. Optional: the highest value the controller accepts (a Luxtronik: “Temperature: return limit”, input 10103). Follow the planned power then never sends a value above it. Empty changes nothing. |
Power and solar sensors
| Setting | Default | Range | What it means |
|---|---|---|---|
| Solar radiation sensor | the setup value | an irradiance sensor | As on Optional sensors. |
| Solar irradiance source | Weather entity | Weather entity / Open-Meteo | As on Optional sensors. |
| Solar irradiance location | your Home Assistant home location | a coordinate | As on Optional sensors. Only used with Open-Meteo. |
| Heat pump power meter | none | a power sensor |
Actual electrical draw. A figure the pump estimates for itself trains the learners the same way as a meter, so prefer a real one (why); it never makes a measured COP (the next row). With it, predicted cost gets a real counterpart, predicted cost gets a real counterpart, and a wood fire is detected reliably. Several sensors stay unavailable without it. |
| Heat pump thermal power meter | none | a power sensor in W or kW |
The heat the pump delivers, from a heat meter. Published as measured_heat_output_kw on the Recommended Power sensor. With the power meter, COP is measured (heat over electricity) rather than inferred from the commanded draw, and the efficiency scale is judged at the supply temperature the pump actually ran at when a supply sensor is mapped, so it stops absorbing weather-driven lift as wear. The house heat-loss and lower-floor learners replay the measured heat for a space-heating interval, and the capacity curve takes it at every load as a floor (it may raise a bucket; only near-nameplate intervals count towards capping). When set it replaces the water flow sensor's estimate, also in a cycle where its own reading is unusable, and an unusable reading pauses the learners that read it. |
Heat pump power meter: meter or estimate (heat_pump_power_source) |
auto | auto, meter or estimate | Whether the power meter measures or is the pump's own estimate (an "Estimated Power Draw" sensor). Auto reads an entity whose id contains estimat as an estimate. An estimate trains every learner as a meter does, but heat over estimated power is the vendor model's COP, so no COP is shown as measured and the heat pump is not graded. |
Heat pump thermal power meter: meter or estimate (heat_pump_thermal_power_source) |
auto | auto, meter or estimate | The same answer for the thermal power meter (an "Estimated Heating Output" sensor is an estimate). |
| Heat pump energy meter | none | an energy sensor |
A cumulative kWh meter is more accurate than adding up power readings, which misses short runs. |
| Heat pump heat energy meter | none | an energy sensor in Wh, kWh or MWh |
A cumulative kWh meter of the heat the pump delivers. It is read over each span of about an hour, so short compressor runs count, and when set it is used instead of the thermal power meter and the water flow sensor. With the energy meter on the same read instants, efficiency is measured as heat over electricity for the span; the house heat-loss learner replays the heat that was delivered. A span whose counter went backwards (a meter reset), jumped past the pump's nameplate, or whose counter resolution is too coarse for the heat expected in it is not learned from. A meter that also counts hot water is split by the operating mode entity, by the time the pump spent in each mode; without that entity, or in a combined mode, the split falls back to the plan's, and an hour that heated the tank is not read as space heating. |
Heat reading covers hot water (heat_meter_sees_dhw) |
off | on or off | Turn on only if the heat energy meter, or else the thermal power meter, also measures the heat sent to the hot-water tank (a meter ahead of the diverter valve). Off, a hot-water interval records no measured COP. A measured COP, and the heat pump grade, need metered heat over metered power; without a heat reading at all the Health tab says COP cannot be measured on this install. |
| Whole-house power meter | none | a power sensor |
A capacity tariff is billed on the whole house, so without this the peak being avoided is only part of the real one. |
| Compressor frequency entity | none | a number entity |
Typically from Modbus or ESPHome. With it the optimizer learns a kW-per-Hz map and recommends a frequency. |
| Actual frequency sensor | none | a frequency sensor |
Many number entities are setpoint registers that echo the last written value. Read from an echo, the watchdog can never see divergence. Leave empty only if the number entity genuinely tracks the machine. Without a number entity, this sensor alone is enough to observe. |
| Water flow sensor | none | a sensor in L/min, L/s, m³/h or kg/s |
The heating circuit's water flow. With the supply and return temperatures it gives the heat the pump delivers (flow × 4.186 kJ/kg/K × the drop), published as measured_heat_output_kw on the Recommended Power sensor. Used only while there is no power or frequency signal (an energy sensor does not switch it off) and no thermal power meter; an unavailable, negative or unknown-unit reading is ignored. It is published on that sensor, and it is the heat the two interval learners replay the elapsed period with — the house heat-loss scale and the lower-floor ratio — for an interval the plan gave to space heating alone; a hot-water interval carries no usable space figure, so that replay falls back to the commanded draw. |
| Frequency mode | Observe | Observe / Control | Observe learns and recommends but never writes. Switch to Control only after validating the entity against your hardware: writes go through number.set_value, at most one per five minutes, clamped to the entity's own range, and three ticks of divergence stand the controller back down to Observe. Control needs the number entity; with only the sensor the page refuses it. |
| Lowest compressor frequency | 20 Hz | 1–250, 1 steps | The bottom of the compressor's frequency range, used when only the sensor is configured or when the number entity does not publish its own minimum. The learned map is divided across this range. |
| Highest compressor frequency | 120 Hz | 1–250, 1 steps | The top of that range. A number entity's own maximum always wins over this. |
Heat pump telemetry
| Setting | Default | Range | What it means |
|---|---|---|---|
| Heat pump operating mode | from setup | the pump's mode entity | Read only unless Pump duty control is set to Control. Left empty, the optimizer assumes the pump can do everything. |
| Pump duty control | Off | Off / Observe / Control | Whether the optimizer tells the pump which duty to serve on each plan step. See Pump duty control below. |
| Defrosting | from setup | a binary sensor | On while the pump reverses to melt frost off the outdoor coil. |
| Pump online | from setup | a binary sensor | On while the pump is actually reachable. |
| Fault alarm | from setup | a binary sensor | On while the pump is reporting a fault. Only whether there is a fault is used. |
| Space backup heater | none | a flag entity | On while the pump's own electric backup heater runs in the space heating circuit. Those kilowatts are not the compressor, so the optimizer stops reading the meter as an efficiency measurement while it is on — but the heat still counts, because it is real heat into the house. Worth filling in mainly on a pump that publishes no power meter, where there is otherwise no way to notice the element at all. |
| Hot water tank booster | none | a flag entity | On while the electric heater in the hot water tank runs. Treated like the backup heater above, and each switch-on is also recorded as a hot water rescue: if those recur and you have turned on immersion feedback, the plan starts heating the tank a little earlier. |
| Capacity limited (night mode) | none | a flag entity | On while the pump runs at a reduced compressor speed — night or silent mode on most units. Efficiency and capacity are not learned from those intervals, because what the machine shows then is the cap's. Cost and heat accounting still use the measured power: a speed-capped compressor draws exactly what the meter says. |
| Supply (flow) water temperature | none | a temperature sensor |
The water the pump is sending out to the heating system. The optimizer learns how far your system's supply runs from the model's own weather curve (an installer offset, or a curve set steeper or flatter than the model's). On its own that offset is recorded only. It changes plans and costs only when Price the supply temperature lift on Heating system and heat storage is on; otherwise the learned COP scale still absorbs the extra lift of hotter water. Most useful on a system with no buffer tank, where the pump feeds the radiators or floor loops directly. |
| Return water temperature | none | a temperature sensor |
The water coming back to the pump. Check which pipe this is. See the note below. |
The return slot is the pump loop's return, not necessarily the floor's. If the pump feeds your floor loops directly, with no buffer tank and no mixing valve in between, the two are the same water and the same sensor may go in both this field and Floor heating return temperature sensor on the sensors page. Behind a buffer tank or a mixing valve they are different water: the pump's return comes back from the tank, the floor's from the slab, and they can differ by ten degrees or more. Floor heating return temperature sensor is what the optimizer estimates your slab temperature from, so filling it with the pump's return on such a system tells it the slab is far hotter or colder than it is, and it will under- or over-heat the lower floor accordingly.
Pump duty control
A pump left on its own serves whichever demand its two thermostats see, so a step the plan meant for hot water only can turn into space heating in a house that is already warm. With Pump duty control at Control the optimizer writes, at every 15-minute plan step:
| Plan step | Operating mode | Heat pump DHW set-point | Space-heating set-point |
|---|---|---|---|
| Hot water only | DHW (Hot Water), when the mode entity offers it | the hot water set-point on the hot water page | the space gate (below) |
| Space heating only | Heating, when the mode entity offers it | the same, or the hot water gate (below) | the heating value |
| Both | split: DHW (Hot Water) for the step's hot-water share of its 15 minutes, then Heating (see below) | as in those two rows | as in those two rows |
| Neither (idle) | left as it is | the same | the space gate |
| Every fallback | Heating + DHW | the same | the hold value |
- For a Flow temperature entity (and a Return temperature one,
below) the heating value follows the planned power. At full power it is 55 °C (the
flow_heat_coption, when set), or the entity's maximum if that is lower. A lower planned level moves the target toward the return-water temperature, or toward 35 °C when no return sensor is configured, so the pump's own water thermostat can deliver that level. A fixed 55 °C never cycles, and a slot the plan priced below the pump's minimum then runs at that minimum. The supply only gets as hot as your radiators or floor can take the pump's output, so in mild weather it stays below the ceiling. The space gate is the entity's minimum, never below 25 °C. The hold value, for when the plan is not in charge, is 35 °C (the flow the pump's rated COP assumes), or the model's weather curve where that is higher. The curve is never written above the heating ceiling; the bare 35 °C is, if you set the ceiling below it. The model's weather curve is a pricing curve, not a set-point: written as one, it held the pump at 25 °C and underheated the house. The lift at the lowest level is 5 K over the inlet (flow_min_lift_k) and the ceiling 55 °C (flow_heat_c); both are on Sensors and entities, once the unit is Flow or Return temperature (the two fields appear once that unit is saved). Those defaults suit a controller that holds its supply at the set-point. - For a Return temperature entity — a controller that takes the
number as its return-water target, as a Luxtronik (alpha innotec,
Novelan) through its Smart Home Interface is assumed to — everything above
applies, with these differences:
- The values derived from a supply temperature — the 35 °C hold, the weather curve and the 25 °C gate — are written 5 K lower (the rated supply-over-return spread, an assumption from the W35 rating point), and so is the 35 °C floor used when no inlet sensor reads. The hold is always capped at the heating ceiling. The gate a step that does not heat writes is therefore 20 °C (or the entity's minimum, if higher): a 25 °C return target sits above a floor return cooled overnight, and a controller that modulates on target minus return would heat on a step meant to be off. The lift at the lowest level is taken from the measured return or this 20 °C gate, whichever is higher.
- The lift is taken only from the heat pump's return, the buffer tank or the floor return, never from the valve outlet, which is house-side supply. With none of them reading, the floor is the 30 °C hold. Map the heat pump's return sensor.
- A ceiling write counts as "the pump may draw its maximum" for the learned power range and the ceiling probe only while the measured return sits at least 5 K below the ceiling. Closer than that, the pump is assumed to modulate down, so those draws do not teach the range a lower top.
- The lift and the ceiling are written as you set them, and their defaults stay 5 K and 55 °C. Those are assumed to be too high for such a controller: on the install this was written for, a 5 K lift ran the compressor near full speed at the plan's lowest level, and a 55 °C return target would overheat the system water. Choose the lift small enough that the compressor runs near its minimum at the plan's lowest level; check it against the measured frequency and power. Choose the ceiling above the highest return you see in normal heating plus the lift (otherwise a heating step writes a target below the return, and such a controller presumably stops), and no higher than the controller accepts: a Luxtronik clamps the target to its own minimum return target and return limit, so a ceiling above the limit is written but not followed. A controller that starts heating only once the target sits its hysteresis above the return is not started by a smaller lift; it only keeps a running compressor near its minimum. That hysteresis is a setting of the controller, not a fixed 2 K: a Luxtronik accepts 0.5 K at the least, and the start threshold in effect (the return target less the hysteresis) is input 10107 of its Smart Home Interface, which ha-luxtronik-shi publishes as its Demand border sensor (the contributor's answers). This integration does not read it. On the install this was written for, a 0.5 K lift held 26–31 Hz once running, 1–1.5 K ramped to 73–81 Hz. For a low-temperature floor heating, 0.5–2 K and 30–40 °C may be a starting point; check them against the compressor's frequency and power.
- The integration that exposes the controller must poll it at least every 10 minutes and restore its heating mode after a controller restart: a Luxtronik Smart Home Interface drops every value set through it after 600 s without access and after each restart. Any access re-arms those 600 s, a read as much as a write, so polling alone keeps a written value; ha-luxtronik-shi polls every 30 s by default and offers 10–300 s, and restores what it wrote after a controller restart only where its restore-after-device-reset option is on (the contributor's answers). A reverted set-point is noticed and written again; a reverted heating mode is not visible to this integration. No second tool may write the same registers: a Luxtronik then silently discards writes (error 816).
- Downgrading: a version before this option reads Return temperature as Indoor temperature and writes the planned room temperature to the entity. Switch the unit back to Flow temperature before downgrading.
- Power feedback (Flow or Return temperature, with a heat-pump power
sensor). A controller that integrates on target minus inlet keeps
speeding up for as long as the target sits above the water, and the
inlet-plus-lift value above rises with the inlet, so the planned level is
never reached: on the install that reported it, a planned 0.53 kW drew
1.1–1.6 kW. With Follow the planned power on the measured draw on (the
default), a space-only step below full power writes the inlet-plus-lift
value for the first 5 minutes of a run (the controller's start
programme), then nudges the heating value 0.2 K per minute down while the
draw, averaged over 3 minutes, is above the planned level and up while it
is below, and holds it while the two are within 10 % of the planned level
(of the pump's minimum power, where the plan asks less).
It goes no lower than 0.3 K below the inlet, no higher than the ceiling,
and never to the gate. Hot water, both duties, a boost, a defrost, the
system-identification experiment and full power write the value above
unchanged and start the loop over. Where the controller cuts a written
value to its own limits, that cut is taken as the run's limit and no
repair is raised. Preconditions on the controller:
- its heating hysteresis is at most the lift (Luxtronik: 0.5 K, its minimum), or the first write of a run does not start a stopped compressor — the same limitation as without the loop;
- its minimum return target sits below the return during the heating
season, or the loop cannot wind the compressor down past it. A
Luxtronik cuts the set-point to its minimum return target (input 10104
of its Smart Home Interface, parameter 979) and its return limit (input
10103, parameter 87), both of which ha-luxtronik-shi publishes as
sensors (the contributor's answers).
Name them as the two optional limit sensors on Sensors and
entities (
space_setpoint_low_limit_entity,space_setpoint_high_limit_entity) and the loop stays inside them, so no write is cut. A limit sensor is read whatever its age, since a setting reports only when it changes; one that is unavailable, not a number or outside −20 to 100 °C is left out, and so are both when the lower is not below the upper. An upper limit below the lowest heating value (the gate plus one step of the set-point entity) is left out too: the gate is the value that means off, and no heating step writes it. They bound the loop alone: the first write of a run is the inlet plus the lift either way. Without them the two limits are taken from the value the controller reports back after a write.
- For an Indoor temperature entity each of the three is the step's planned room temperature, clamped to the entity's range (5 °C as the gate where the mode offers no hot-water-only option). An entity whose own minimum is above the planned room temperature cannot be an indoor set-point, so it is not written at all and a warning is logged: set its unit to Flow temperature.
- Space heating steps are heating only. The cheapest hours to heat the house need not be the ones that keep the tank ready for its next hot water window, so the pump's own tank thermostat is kept out of them. The exception: while the optimizer holds your disinfection switch on, a space step is Heating + DHW, so the planned anti-legionella cycle can run. A heating-only mode the optimizer wrote does not stop the next plan from making hot water, and the "set-point below the disinfection temperature" notice does not fire on the optimizer's own hot water gate (see below).
- Idle steps leave the mode alone. The mode on the pump served the duty that just finished, whose thermostat the plan has just satisfied, so it is the least likely to start anything; Heating + DHW would arm both.
- Tuya or Modbus, the same logic. The entities decide. The tuya_heat_pump mode select offers DHW (Hot Water) and Heating, so the mode is the gate. The GCHV Modbus package's HP Setting mode (register 44) offers only Off / Cool + DHW / Heat + DHW — no single-duty heating mode either way — so the other duty's set-point is the gate: the space set-point (for example HP Occupied heating water setpoint, register 401) is lowered to the entity's minimum (never below 25 °C) on hot-water-only steps, and the DHW set-point (HP DHW normal setpoint, register 404) to its minimum (never below 30 °C) on space-only steps.
- A step the plan gives both duties is split, so the optimizer rather
than the pump's two thermostats decides which runs: hot water first, for
the step's hot-water power over its total power, times 15 minutes, then
heating for the rest. A share under 5 minutes goes to the other duty for
the whole step. On a pump with no single-duty mode, each part is *Heating
- DHW* with the other duty's set-point lowered to its gate. A boost or a disinfection cycle keeps Heating + DHW for the whole step.
- Rails. A hot-water-only stretch lasts at most 90 minutes (30 below
-10 °C outdoors), idle steps after it included, then Heating + DHW
returns — unless the room is already at or above the step's planned room
temperature, when a warm house needs no space heat. A stale plan, comfort
mode, a system-identification experiment and unloading the integration
all get the fallback row, the space set-point apart (see below). A boost switch adds its own duty to the plan's
step: Boost Space Heating alone writes Heating, DHW Boost alone
writes DHW (Hot Water), and a step that also wants the other duty
writes Heating + DHW. Boost mode writes Heating + DHW with the
heating-flow ceiling (55 °C, or
flow_heat_c) rather than the fallback's. - While Optimizer active is on, the optimizer holds what it wrote. A reading of those three entities that differs from what the optimizer wrote — a change made on the pump, in an app, by a schedule, or the pump's own reset — is written back at once. To change the pump by hand, turn Optimizer active off first: from then on nothing is written to the pump, not even the fallback row, until you turn it back on — except the space set-point, restored once as described next. Readings in the first 20 seconds after a write are not counted: the tuya_heat_pump integration shows the value it sent for about 8 seconds whatever the pump reports.
- Turning it off restores your space set-point. Before its first write to the space-heating set-point entity, the optimizer reads the value there and keeps it, across restarts too. Turning Optimizer active off, and every unload (a reload after an options change, a disable, Home Assistant stopping), writes that value back. A value you set on the pump while the optimizer is on becomes the one restored, though the optimizer still writes over it until you turn it off (outside the entity's own minimum and maximum, the nearest value it takes); a value set while it is off is read again when it next writes. A reading equal to the optimizer's own last write is never taken as yours: after an upgrade from a version without this, the set-point is not written until it reads anything else, so set it on the pump once. The mode and the hot-water set-point are not restored.
- A write the pump does not hold is retried. If the value written back still does not hold, a warning repair notice is raised and the value is sent again every 5 minutes; the notice clears on the first write that holds, or when Control is left. An unavailable mode entity is no reading at all.
- A pump switched off is left alone. While the heat pump power switch reads off, nothing is compared or written: switched off, a pump can report set-points of its own (a Tuya pump reads 25 °C). Once it is on, a reset that is still there is written back like any other difference.
- A disinfection cycle writes its own temperature. While the plan's step runs the anti-legionella cycle, or the integration holds the pump's disinfection switch on, the hot water set-point written is the disinfection temperature, or the everyday set-point where that is higher, on the entity's step rounded up and never above the entity's maximum. Because the optimizer writes the cycle's temperature itself, the "set-point below the disinfection temperature" notice does not fire on any hot water set-point the optimizer wrote; it still fires on a value set by anybody else, and, with Control off, on the pump's own set-point.
- Its own mode is not a pump limit. A mode the optimizer wrote does not stop the next plan from heating the house or making hot water, even when the pump has not shown it yet or after a restart; one set by anybody else does.
Observe writes nothing. In Observe and Control the optimizer keeps a
ledger of the last 24 hours: per 15-minute step, the duty the plan wanted
against what the pump did, and a verdict — delivered, space-instead,
dhw-instead, idle-instead, unknown or baseline (no plan duty). What the
pump did is read from what the integration already reads: the power
entity (running or not), the operating mode (DHW (Hot Water)) and the
tank temperature (a rise of 0.5 °C over the step counts as hot water).
Without a power entity only hot water can be seen, and other steps are
unknown; a Heating + DHW run reads as hot water, and a large draw can hide a
tank rise. The counts and the steps are in the diagnostics download under
pump_duty → ledger, and start empty after a restart. Their use is to decide
whether Control is worth turning on: the share of delivered steps is how
often the pump already does what the plan wanted. Off (the default) does
neither.
Heating system and heat storage
Everything between the heat sources and the emitters. Leave the valve at No mixing valve if you do not have one — the model is already correct for that case. A throttling valve is any mode other than No mixing valve — Set by hand, Read from a sensor or Commanded by the optimizer — where a real valve exists and limits delivery to the emitters, which is what the hydronic layout catalog below keys off.
| Setting | Default | Range | What it means |
|---|---|---|---|
| Mixing valve | No mixing valve | No mixing valve · Set by hand · Read from a sensor · Commanded by the optimizer | Set by hand is a valve you set yourself and tell the integration about. Read from a sensor means it can see the target but not change it. Commanded writes the recommended target through the control entity below. |
| Valve target temperature | 0 °C | 0–30, 0.5 steps | The indoor temperature the valve holds. 0 means "use the top of your comfort band", which is the recommended setting: the building charges first at no efficiency cost, and the tank takes only the surplus. |
| Valve target sensor | none | a temperature sensor | Reads the valve's target instead of using the fixed value above. |
| Valve control entity | none | number, input_number or climate |
Required for Commanded by the optimizer. Written after each planning cycle, and only when the answer changes. |
| What the control entity expects | Indoor temperature | Indoor temperature / Flow temperature | A declaration, not a write. Indoor temperature — a room set-point — is what has always been written, and the safe default. Flow temperature is for a valve or heat-pump controller whose set-point is a water temperature, derived from the same flow curve the model already uses for a dumb valve. Pointing an indoor target at a flow entity would command roughly 21 °C to something expecting 35–45 °C. |
| Price the supply temperature lift (no mixing valve) | off | on/off | For a plant with no mixing valve, where the pump feeds the emitters directly. When on, every plan and cost accounts for the pump working harder to make hotter water: the supply temperature is the model's own weather curve plus the offset learned from the Supply (flow) water temperature sensor, if you set one. With that sensor the efficiency health watch also judges the pump at a common water temperature, so a hotter supply is not reported as a failing compressor, and it skips any interval where the sensor has no fresh reading — so while that sensor is dead the watch does not judge space heating at all. Readings judged this way keep their own baseline, so switching the option or the sensor on or off starts that baseline afresh rather than comparing unlike numbers. The learned offset is capped at 15 °C, so on a plant whose supply runs well above the modelled curve only part of the extra work is priced. The lift is only charged above a 35 °C supply. Refused together with a throttling valve, whose tank temperature already sets the price. |
| Buffer tank size | 35 L | 10–1500, 5 steps | The tank between pump and circuits. It is only planned around as a store when a throttling valve exists and the volume is at least 100 L; below that it holds less than one optimizer step of heat. |
| Maximum buffer tank temperature | 70 °C | 40–90 | A hard ceiling. The tank is never charged above this, however cheap electricity is. |
| Hot water is made from the buffer tank (combi tank) | off | on/off | For one tank of heating water that serves both heating and hot water with no separate hot water tank: a multifunction or hygiene store with an internal coil, a tank-in-tank, or a fresh-water station on the buffer. The buffer and the hot water are then planned as one store, so its heat is counted once. Refused unless the buffer is a store (a throttling valve and at least 100 L), hot water is on and no wood coil heats the hot water. Enter the tank's heating-water volume as the buffer size. For the buffer cooling rate, prefer the datasheet's ErP standing loss S in watts at 65 °C: the loss per kelvin is S / 45 K, assuming a 20 °C room. Example: 111 W over 504 L is 2.47 W/K, about 0.106 °C/h at the 25 K reference. One probe is read as the whole tank's mean, so point the buffer sensor at the middle well (with a hot water sensor only, that one is used). A tall, stratified store without a middle well has no single probe that reads its mean, and a top probe alone reads high, so the plan believes the tank holds more heat than it does. Make the buffer temperature entity a template sensor averaging a top and a bottom probe instead. That average is an estimate of the mean, not the mean itself: the temperature between the two probes does not change in a straight line. As an example, not a guarantee: on one user's 600 L store the top and bottom probes differed by a median 24.8 K, and the top probe alone overstated the stored heat by about 9 kWh. Two tanks in one shell, a buffer section under a hot water section, are not a combi tank: set them up as two tanks. While it is on, the hot water energy sensor counts the heat pump's hot-water-mode charge of the shared tank, which includes heat the heating later draws from it: it is one store, so no meter can split it by use. |
| How the tank makes hot water | Internal coil | Internal coil / Tank-in-tank / Fresh-water station / Custom | Changing it fills in the two numbers below (coil 0.85 and 30 L, tank-in-tank 0.95 and 150 L, station 0.75 and 0 L); edit them afterwards, or choose Custom. A multifunction store with a 40 L coil is Internal coil with 40 L. |
| Exchanger effectiveness | 0.85 | 0.1–1 | (tap − cold inlet) / (tank − cold inlet) at your usual draw flow. It moves the tank temperature a tap minimum needs (45 °C at the tap from a 10 °C inlet needs 51.2 °C in the tank at 0.85); the legionella target stays a tank temperature. A station's effectiveness falls with flow (one table: 0.88 at 16 L/min, 0.58 at 38 L/min), so read it at your typical flow; manufacturers recommend at most 60 °C on the primary side. |
| Drinking water held inside the tank | 30 L | 0–500 | The coil's content or the inner tank (about 100–250 L); 0 for a station. It adds to the store's heat capacity. |
| Run the legionella cycle anyway | off | on/off | With 3 L or less of drinking water in the tank there is none standing to disinfect, so the cycle defaults off there; this forces it on. Drinking-water rules still expect delivery at 60 °C (large systems) or 50 °C (small). |
| Temperature after the wood/heat-pump mixing valve | none | a sensor | With the tank sensors, this says how much of the heating a fire is covering right now, so electric heat can stand down by that much instead of all-or-nothing. |
| Wood tank top sensor | none | a sensor | The switch for the two-tank model. Together with the bottom sensor it says how much a fire has left: a hot top over a cold bottom means the charge is nearly spent. |
| Wood tank bottom sensor | none | a sensor | Both are needed for the remaining-energy estimate; one alone is read conservatively. |
| Wood tank volume | 500 L | 50–3000, 50 steps | Bounds how much free heat a fire can still deliver. The Quick setup question Wood buffer tank answers this with one toggle. |
| Hot water refilled through the wood tank | off | on/off | The hot water tank's cold inlet passes through a coil in the wood tank, so refill water arrives preheated. Only takes effect when the wood tank is modelled as its own store. |
| Wood furnace | off, unless a wood tank, coil or flue sensor is already set | on/off | Off hides the wood probes, detection and the four fuel-price fields; stored values are kept. A lone 500 L tank volume does not turn this on. |
| Detect a wood furnace or other heat source | off | on/off | Watches the hot-water and buffer tanks for warming the heat pump cannot explain: rising while the compressor is off, or faster than the pump could deliver. While a source is believed active, planned electric hot water is held back — paying to heat water already being heated for free is the most expensive mistake available. Two consecutive confirming samples are needed before it acts. |
| Stove or flue sensor (optional) | none | a sensor, binary_sensor, switch or input_boolean |
A flue thermostat or stove switch you already have. Trusted over the automatic detection in both directions — it can say a fire is lit, and it can say one is not. A switch stays trusted until you change it; a temperature probe is trusted for an hour after its last report, so one stuck reading hot on a flat battery cannot hold heating back forever. |
| Temperature rise that counts as evidence | 1.5 °C/h | 0.5–10, 0.1 steps | The tank-warming rate above which something is judged to be heating the tank. Below it, sensor quantisation and thermosiphon drift dominate. Raise it if normal operation triggers detection. |
| How long to keep assuming it after it stops | 90 min | 15–360, 15 steps | After the evidence fades, the assumption decays over this window rather than clearing — re-planning a full charge the instant a fire burns down is the wrong move. A sensed wood tank can shorten the window, never extend it. |
| Wood type | Mixed | Birch · Pine · Mixed | The billed species. Used with packing and the price below to get a SEK/kWh figure for the cheaper-than-pump sensor. |
| Packing | Packed (stacked) | Packed (stacked) · Loose (dumped) | Packed is stacked (travad); loose is dumped (stjälpt) and billed at 0.60 of packed. |
| Price per cubic metre | none | 0–10 000, 10 steps | What you pay per billed cubic metre. Empty keeps the cheaper-than-pump sensor unavailable — there is no silent default. |
| Furnace efficiency | 75 % | 10–95 | Share of the wood's energy that reaches the tank. |
| Light the furnace this long before a cheaper window | 60 min | 0–240, 15 steps | How far ahead of today's first cheaper window the recommended lighting window opens: a batch boiler spends roughly half an hour to an hour going from kindling to a full burn with its water hot enough for the load valve to charge the tank. The window closes as the cheaper window opens, and never opens before now. |
| Heating circulation pump switch | none | switch / input_boolean |
Paused only in slots that are provably idle and warm — it always runs when heat is planned, when it is freezing outside, or when any room is near its comfort floor. |
The four fuel-price fields and the external-heat detection group render only
while Wood furnace is on. The
Wood Cheaper Than Heat Pump sensor stays unavailable until the furnace is
on, a wood-tank probe is set, external-heat detection or the DHW wood coil
is on, type and packing are set, the billed price is greater than 0, and
efficiency is between 10 and 95. A usable wood tank alone is not enough.
While it is available it also carries today's cheaper windows — each run of
planned heat-pump steps whose heat costs more than wood's, as start and
end in the cheaper_windows attribute — and the recommended lighting
window ahead of the first of them in lighting_start and lighting_end.
Both are empty on a day with no cheaper window. The
wood notification blueprint sends them to a phone.
Building type and emitters
The same six questions as the setup questionnaire, plus the structural properties the preset does not derive — so a hand-set window area survives turning the preset on.
| Setting | Default | Range | What it means |
|---|---|---|---|
| Derive thermal values from the building type | off | on/off | While this is on, every save of this page recalculates the ten derived values on Thermal model (expert) from your answers below and overwrites whatever is there. It never runs at any other time. Changing one of those values to a different number on the expert page switches this back off, so your own number stays; re-saving the expert page unchanged does not. |
| The six questionnaire fields | as setup | see setup step 3 | Identical questions and choices; one field list serves both flows. |
| Window area facing the sun | 10 m² | 0.01–50, 0.5 steps | Glazing that gets direct sun. Not derived by the preset. |
| How much sunlight the windows let through | 0.7 | 0.1–1.0 | The glazing's solar heat gain coefficient. |
| Wind sensitivity | 0.03 | 0.0–0.5 | As setup step 5. |
| Rain sensitivity | 1.15 | 1.0–1.5 | As setup step 5. |
Thermal model (expert)
The raw single-zone numbers, otherwise only asked at setup. A field left empty keeps its current value and is never saved. Buffer tank size lives on Heating system and heat storage; window area and the glazing coefficient live on Building type and emitters; the two-zone switch and the per-floor numbers live on Two-zone model.
| Setting | Default | Range | What it means |
|---|---|---|---|
| House thermal mass | the setup value | 0.5–80 kWh/°C | Heat stored per degree by the room air, furnishings and light fabric. |
| Heat loss coefficient | the setup value | 0.01–1.0 kW/°C | Heat lost per degree of indoor-outdoor difference. Not shown while the two-zone model is on, which uses each zone's own heat loss instead. |
| Slab floor thermal mass | the setup value | 0.1–60 kWh/°C | Heat stored per degree by the slab or the radiator circuit. |
| Slab-to-room heat transfer | the setup value | 0.02–5.0 kW/°C | How fast that store gives its heat to the room. |
| Heat pump nominal COP | the setup value | 1.5–6.0 | Units of heat per unit of electricity under normal conditions. |
| Heat pump max power | the setup value | 1–20 kW | Electrical input at full output. |
| Heat pump min power | the setup value | 0–10 kW | The lowest input the pump can hold without cycling. |
| Compressor runs below min power | Automatic | Automatic, No: on/off, Yes: modulating | No: on/off plans every step at 0 or between min and max power, hot water and space heating together. Yes: modulating plans a level below min power as an average the pump reaches by running part of the step. Automatic counts a power switch plus a setpoint with no frequency entity as on/off, anything else as modulating. |
| Heat pump COP loss at max power | the setup value | 0–0.5 | The share of efficiency lost at max power rather than min power. See the setup screen for the limit the page enforces. |
Changing a derived value turns the derivation off. These fields are what Building type and emitters works out from the questionnaire. If that switch stayed on, the next save of that page would take your edit back — so changing any of them to a different value switches it off instead, and the page says so while it is still armed. Only a real change counts: pressing Submit without touching anything, re-typing a value that was already there, or editing a field the questionnaire does not own all leave it on.
A stored value outside a field's normal range widens that field rather than blocking the page. The ranges cover the physics of a 40–400 m² building; a 20 m² cabin or a 1000 m² block can derive something outside them. The one field holding such a value stretches to show it and is flagged with a warning; every other field keeps its normal limits.
Two-zone model
| Setting | Default | Range | What it means |
|---|---|---|---|
| Two-zone model | Automatic | Automatic · On · Off | Automatic means two-zone as soon as any zone value has ever been saved — which can only ever turn it on. Off is the only way back to single-zone, because values written during setup live where the options flow cannot erase them. On forces two-zone using the values below or their defaults. |
| Upper floor thermal mass | the setup value | 0.25–60 kWh/°C | Heat stored in the upper zone. |
| Lower floor thermal mass | the setup value | 0.25–60 kWh/°C | Heat stored in the lower zone. |
| Upper floor heat loss | the setup value | 0.001–1.0 kW/°C | The upper zone's own loss coefficient. |
| Lower floor heat loss | the setup value | 0.001–1.0 kW/°C | The lower zone's own loss coefficient. |
| Inter-zone heat transfer (kW/°C) | see setup | kW/°C | How fast heat moves between the two floors. |
| Share of heat going to radiators | see setup | 0–1 | Share of heat delivered through radiators rather than the slab. |
| Upper floor area ratio | see setup | 0.1–0.9 | Splits the solar gain between the floors. |
| Solar orientation factor | the setup value | 0.0–1.0 | How well the glazing faces the sun over a day. |
Hot water tank and inlet
Tank size, daily draw, inlet water and the disinfection extras. The first-menu Hot water page is the schedule and the hold temperatures.
| Setting | Default | Range | What it means |
|---|---|---|---|
| Hot water tank size | 200 L | 50–1500, 10 steps | A larger tank stores more cheap electricity and can skip more expensive hours. |
| Hot water used per day | 150 L/day | 50–1500 | Roughly your household's daily draw. Used to size what to store before each period. |
| Tank heat loss | 0.3 °C/h | 0.05–3.0, 0.05 steps | Standby cooling at 45 °C in a 20 °C room. A starting point only: the real rate is measured and refined. |
| Cold water inlet temperature | 10.0 °C | 2–25, 0.5 steps | Yearly average temperature of the water refilling the tank. Change it only if you have measured yours. |
| Seasonal inlet swing | 0.0 °C | 0–8, 0.5 steps | How far the incoming water swings around that average over the year. 0 treats it as constant. |
| Cold water inlet sensor | none | a temperature sensor | When set, its live reading replaces the model above. |
| Greywater heat recovery effectiveness | 0.0 | 0–0.9, 0.05 steps | The fraction of drain heat a drain-water recovery unit returns. 0 means none installed. |
| Learn heavy-day hot water targets | off | on/off | Makes the tank ready for a heavy day rather than an average one. Needs a tank sensor, configured time frames, and a couple of weeks of evidence. |
| Credit disinfection from any heat source | off | on/off | If a wood boiler, solar coil or immersion heater already got the tank hot enough and held it there, count that as a completed cycle. |
| Let the anti-legionella cycle pick a cheap day | off | on/off | Allows the cycle to run a day or two early when electricity is unusually cheap. The deadline is still always honoured. |
| Earliest anti-legionella re-run | 5 days | 1–14 | A floor on how close together cycles may run, however cheap the day. |
| Pump's disinfection switch | none | switch / input_boolean |
A switch or helper that starts the heat pump's own anti-legionella program. Its state is read on every update and published on the hot water sensor's attributes as dhw_disinfection_switch; the attribute is absent while no switch is set. |
| Disinfection switch mode | observe | observe / control | Observe reads the switch and never writes it. Control turns it on when the plan's anti-legionella boost starts and off when that boost ends — including when the boost is cut off after 12 hours or disinfection is switched off mid-cycle. It never turns the switch on while the pump's mode makes no hot water, read on the same update rather than from the last plan. It only turns off a switch it turned on itself: a switch that was already on when the cycle began is left alone. One limit: if you turn the switch on by hand while a cycle the optimizer started is running, it is turned off when that cycle ends, because the two cannot be told apart. What the optimizer turned on is remembered across restarts and turned off again from the switch's real state — after a restart or reload mid-cycle, after switching this setting to observe, to another switch or to none, and when the integration is unloaded (a switch whose unload OFF the switch itself read back as off is forgotten, so a program you start while the integration is unloaded is left alone; one whose OFF failed is remembered and turned off at the next start). OFF is re-sent on each update while that switch still reads on. A switch it turned on that cannot be read for half an hour after being renamed, removed or replaced here is given up with a repair notice saying it may still be on. Every write waits for Home Assistant to finish the service call, for at most 10 seconds, and counts only when the switch reads back the state it was asked for; a switch with no state at all is never written to, and its record is kept. A write that fails, times out or does not read back raises a repair notice, is retried on the next update, and the notice clears on the first write that goes through. Control without a switch is refused when you save. |
| Shower flow rate | 8.0 L/min | 4–20, 0.5 steps | Only used to translate the tank's contents into shower minutes on the DHW Mixed Water sensor (sensor.heat_pump_optimizer_dhw_mixed_water). |
Hot water circulation
The DHW loop pump. The heating-circuit circulation pump lives on Heating system and heat storage.
| Setting | Default | Range | What it means |
|---|---|---|---|
| Hot water circulation pump switch | none | switch / input_boolean |
When set, the circulation loop pump runs only during your hot water time frames plus the lead time below. |
| Start circulation before a time frame | 20 min | 0–120, 5 steps | So the loop is already hot when the time frame opens. |
Solar panels
If you have solar, heating hot water or the buffer from surplus beats exporting it at the compensation rate. Told about the array, the plan prices each hour at what consuming actually costs you.
| Setting | Default | Range | What it means |
|---|---|---|---|
| I have solar panels | off | on/off | Lets the plan run the heat pump on your own surplus instead of selling it for less than bought power costs. |
| Installed capacity | 0.0 kWp | 0–100, 0.1 steps | The array's rated peak, used to scale the production forecast. |
| Overall system efficiency | 0.80 | 0.3–1.0, 0.01 steps | Everything between sunlight and the meter: inverter losses, panel temperature, dirt, orientation. |
| Export compensation per kWh | 0.0 | 0–10, 0.01 steps | What you are paid for an exported kWh. While you have surplus, that is what an extra kWh of heating really costs. |
| Export compensation entity | none | a sensor | Use this instead if your compensation follows the spot price. |
| Solar production sensor | none | a power sensor |
Lets the forecast correct itself against what the roof actually delivers. |
Self-learning and diagnostics
The sensor watchdog is on by default and protects everything else. The three core learners are off until you turn them on. External-heat detection lives on Heating system and heat storage with the wood group. The remaining opt-in learners are on Advanced learning features.
| Setting | Default | Range | What it means |
|---|---|---|---|
| Ignore sensors that stop updating | on | on/off | A dead battery leaves a normal-looking value in place forever. With this on, an old value is treated as missing and learning pauses instead of learning the flatline. |
| Allow this much extra age | 1.0 | 0.5–10.0, 0.5 steps | Raise it if sensors that deliberately report rarely are being flagged. |
| Learn my comfort preference from overrides | off | on/off | Every temperature override says the plan went too far one way. This adjusts the comfort weight from that, shows the result on its own sensor, and has a reset button. |
| Allow a one-off measurement experiment | off | on/off | Lets the optimizer run a small deliberate heating step on a mild, cheap night to measure your house directly instead of inferring it over weeks. Kept too small to notice, and stopped if the temperature drifts. |
| Collect a week of debug data | off | on/off | Records one small row per optimization cycle and one full snapshot a day for seven days, then stops by itself. Download diagnostics then carries the week for a bug report. The debug_collect service and the Learning Finalize Debug Collection button drive the same collection. |
| Estimate prices past the published horizon | on | on/off | Tomorrow's prices arrive around 13:00. Until then this uses your learned daily price shape instead of a flat repeat, and the plan marks which hours are estimated. |
Advanced learning features
| Setting | Default | Range | What it means |
|---|---|---|---|
| Staggered recovery after a power cut | off | on/off | After an outage everything restarts at once, which is exactly when a new monthly peak gets set. This opens a two-hour recovery window where hot water queues 45 minutes behind space heating unless the tank is genuinely low. A restart that finds the last saved heartbeat ahead of the clock (the clock was set back, so the gap cannot be known) counts as an outage too. |
| Ease heating while a window is open | off | on/off | The detector always pauses learning; this additionally lowers the target by 1 °C while a window appears open. Off by default because it moves real heat. |
| Plan around immersion heater use | off | on/off | Repeated immersion use raises the hot-water planning margin so the heat pump gets there first. It also declares the immersion element: when the power meter reads more than the compressor's nameplate can draw, the excess books as its own ledger line. With this off and neither pump heater flag on, nothing books as resistive heat, because the meter alone cannot tell an element from a compressor over its configured nameplate. |
| Tell snow from rain in the forecast | off | on/off | Rain soaks the envelope and raises heat loss; snow does not. Needs the Open-Meteo connection. |
| Assume less sun after heavy snowfall | off | on/off | Halves modelled solar gain for two days after heavy snowfall. Deliberately crude. |
| Plan within measured heat pump capacity | off | on/off | Learns how much heat the pump has actually delivered at each outdoor temperature. It can only trim optimism — at least 60 % of nameplate always stays available. |
| Learn how much sun the windows really admit | off | on/off | Scales solar gain against sunny-hour prediction errors, clamped between 0.3× and 2× the configured value. |
| Learn the household's daily heat rhythm | off | on/off | Learns a per-hour internal-gains profile from dark-hour prediction errors, tethered to the configured value. |
| Learn a correction to the heat curve | off | on/off | Learns a standing correction from days that held comfort with room to spare — clamped, and snapping back to the installer's curve on any comfort miss. It can only cool an over-hot curve, never heat. |
Fuse and peak guards
| Setting | Default | Range | What it means |
|---|---|---|---|
| Main fuse size | 0 A | 0–125 | From your grid contract. 0 means unconfigured, which keeps the fuse advisor, the fuse guard and the headroom sensor dormant — there is no safe default to guess. |
| Phases | 3 | 1–3 | Nearly every Swedish house is 3-phase. |
| Keep the plan under the main fuse | off | on/off | Caps planned power at what the fuse leaves after the rest of the house. If a cap would make the comfort floor unreachable, the plan says so instead of silently going cold. |
| Live peak guard | off | on/off | Watches the power meter and, when the current metering window is projected to set a new billed peak, holds back electric hot water and nudges the heat curve down for the rest of that window. Needs a power meter. |
| Peak guard margin | 0.5 kW | 0.0–3.0, 0.1 steps | How far below the billed threshold the guard starts acting. Larger catches more peaks and intervenes more often. |
| Pump's own night-mode schedule | empty | time frames, like the hot water ones | When the pump's own silent or night mode caps the compressor, for example 22:00-06:00; day selectors such as weekend 23:00-08:00 work too. The schedule lives in the pump's controller, where the optimizer cannot read it, so without this the plan counts on full power in those hours and may buy cheap night quarters the pump will not use. Distinct from the card's Silent windows, which are your wish about noise. A frame shorter than one 15-minute planning step is refused. Leave empty to plan without it. |
| Power kept in silent mode | 1.0 | 0.6–1.0, 0.05 steps | The share of the pump's maximum electrical power it still runs at inside that schedule. Inside those hours the plan's power ceiling is this share of the maximum; where the fuse cap or the measured capacity limit is lower, the lower one applies. 1.0 caps nothing. The range stops at 0.6, the same floor as Plan within measured heat pump capacity, so this can trim the plan but never leave the house without heat. The Capacity limited (night mode) sensor slot is the other half: it keeps the learners off the capped intervals, while this schedule tells the plan about the hours ahead. |
Transfer fees and contract
Fee amounts are in the same currency as your electricity prices; where a label reads SEK, that is a label, not a constraint.
| Setting | Default | Range | What it means |
|---|---|---|---|
| Swedish DSO tariff | None | Ellevio / Vattenfall / E.ON / Göteborg Energi (2026) | Writes transfer-fee rules and the peak-tariff fields. You can still edit the generated text. Dated Sweden-only table — verify against your bill. |
| Grid transfer fee | None | None / Time-of-use rules / Live sensor | The fee your grid company adds per kWh. Spot prices do not include it, so with it configured the plan finally sees the whole marginal price. |
| Fixed transfer fee | 0.0 per kWh | 0–5, 0.01 steps | A flat fee added in every hour, on top of any rules. |
| Time-of-use fee rules | empty | one rule per line | For example Nov-Mar Mon-Fri 06:00-22:00 = 0.25. Month, weekday and time parts are each optional; overlapping rules add together. A rate must be zero or above and at most 10 per kWh — a negative rate or one that size is refused when the page is saved, since the first is a sign slip and the second is öre typed where whole units were meant. |
| Live fee sensor | none | a sensor | For grids with dynamic fees. Its value is added to every planned hour. |
| Fixed contract price to compare | 0.0 per kWh | 0–10, 0.01 steps | If you could have a fixed-price contract, its price per kWh. The Cost Contract Comparison sensor then shows what this month would have cost on it. 0 leaves that column out. |
Heat curve control
For Danfoss ECL110 controllers driven over MQTT, or any controller whose
heat-curve offset Home Assistant exposes as a number. The topics have no
shipped default: each is exactly what you store, an empty or absent topic
leaves that arm off, and nothing is published or subscribed until a topic
is set — an install without an ECL110 never touches these topics. See
ecl110.md for the full picture.
| Setting | Default | Range | What it means |
|---|---|---|---|
| Offset command topic | (empty) | MQTT topic | Where the parallel heat-curve offset is published. |
| Legacy JSON command topic | (empty) | MQTT topic | Only for a setup expecting a JSON payload. |
| Status topic | (empty) | MQTT topic | Where the controller reports its state. |
| MQTT quality of service | 1 | 0–2 | 0 is fine for almost everyone. |
| Retain MQTT messages | off | on/off | Keeps the last offset on the broker so the controller picks it up after a restart. |
| Largest downward offset | −20 °C | −30–0, 0.5 steps | How far the curve may be shifted down during expensive hours. |
| Largest upward offset | 20 °C | 0–30, 0.5 steps | How far it may be shifted up when storing cheap heat. |
| Controller response time | 1.5 h | 0.25–6.0, 0.25 steps | Roughly how long the controller takes to act on a new offset, so the optimizer does not ask for changes faster than the system can follow. |
| Heat-curve offset entity | (empty) | a number or input_number |
The same offset written to an entity instead of, or as well as, MQTT. Kind offset: a whole-curve offset, 0 neutral, that the controller forgets on a restart; turning the optimizer off, or unloading it, writes 0; refused when its own range excludes 0. Kind persistent: a curve setting the controller stores; off and unload write back the value it held before the first write; refused when it reads no value or one outside its own range. Refused when it is an entity the optimizer already writes. |
| What the entity is | Offset | Offset, Persistent | Offset: a temperature difference, not stored by the controller; prefer it where the controller has one. Persistent: a stored curve setting, displaced from its own value with a daily write cap; see ecl110.md. |
| Largest offset written to the entity | 3 K | 0.5–5, 0.5 steps | The entity's offset stays within this many kelvin either way, whatever the MQTT range allows. 3 K is an estimate; see ecl110.md. |
| Largest displacement of a stored parameter | 3 K | 0.5–5, 0.5 steps | Kind persistent only: the stored setting stays within this many kelvin of its value before the first write. 3 K is an estimate. |
| Most writes a day to a stored parameter | 12 | 0–48 | Kind persistent only: writes in one local day, the write back on off included, one always kept for it; 0 or 1 writes nothing. 12 rests partly on forum figures and estimates; see ecl110.md. |
| Least time between writes to a stored parameter | 60 min | 15–360, 15 steps | Kind persistent only: after a write, the next waits at least this long. 60 min is an estimate of three radiator response times. |
Reset to factory defaults
Returns the entry to the state of a fresh installation. Pick the scope and tick the confirmation; submitted unticked, the menu comes back and nothing changes, and closing the dialog cancels.
| Setting | Default | Choices | What it means |
|---|---|---|---|
| What to reset | Settings and learned values | Settings · Learned values · Settings and learned values | Which half of the entry goes back to a fresh installation, or both. |
| Yes, reset | off | on/off | The confirmation. Nothing changes unless it is ticked. |
- Settings: every setting on these pages returns to its default. Kept, so the optimizer stays connected to the house: every assigned entity, the zone and emitter topology (the two-zone switch is written as the settings in force imply it), the hot-water tank, valve and wood-furnace layout, the price and solar-forecast sources and the Tibber token, the plant diagram, the ECL110 MQTT wiring, the pre-fill device and the main fuse.
- Learned values: every learner starts again from the settings: the heat loss scale and lower-floor ratio, the comfort weight, COP, buffer and hot water cooling, the hot water profile and draws, defrost, the heat curve, the price shape, the plant learners and the prediction accuracy history. The billed peaks, the energy ledger, the operating mode, the frequency watchdog's stand-down and any manual plan or override are kept.
- Both.
A snapshot of every learned store and of the settings the reset drops is taken
first. Until the next weekly snapshot, about a week, restore_learned_snapshot
undoes the reset, with the sensors as they are now, and puts the two-zone,
hot-water and wood-furnace switches back as they were stored. The entry then
reloads and plans again straight away. If Home Assistant refuses to unload the
entry, the dialog says the reset was not applied, and nothing is changed.
The hydronic layout catalog
The optimizer models a named arrangement of pipes, not a free-form drawing. A layout is only ever stored as a catalog key, and only when your configuration can actually honour it — so the picture on the card's setup tab, the physics in the model and the settings on the pages above can never drift apart.
Most people never touch this. The layout is derived from what you configured:
- no throttling mixing valve → No mixing valve;
- a throttling valve, two zones and a wood tank top sensor → Two tanks, one 4-way valve;
- any other throttling valve → One tank behind a valve.
The layout editor on the card's Setup tab is where you override that, and Valve on the radiators, slab fed direct is only reachable that way — nothing derives it. If the configuration later stops supporting your stored choice — the valve mode changed, the probe was removed — the derived default quietly takes over again rather than erroring.
flowchart TB
    subgraph L1["No mixing valve (no_valve)"]
        direction LR
        hp1["Heat pump"] --> t1["Buffer tank<br/>(pass-through)"] --> z1["Emitters"]
    end
    subgraph L2["One tank behind a valve (single_tank_valve)"]
        direction LR
        hp2["Heat pump"] --> t2["Buffer tank"] --> v2["Mixing valve"] --> z2["All circuits"]
    end
    subgraph L3["Two tanks, one 4-way valve (two_tank_4way)"]
        direction LR
        hp3["Heat pump"] --> t3["Heat pump tank"]
        w3["Wood tank<br/>(drawn wood-first)"] --> v3["4-way valve"]
        t3 --> v3
        v3 --> u3["Upper floor"]
        v3 --> lo3["Lower floor"]
    end
    subgraph L4["Valve on the radiators, slab fed direct (valve_upper_direct_slab)"]
        direction LR
        hp4["Heat pump"] --> t4["Buffer tank"]
        t4 --> v4["Mixing valve"] --> r4["Radiators"]
        t4 --> s4["Slab<br/>(raw tank water)"]
    end
On every layout the heat pump also feeds the hot water tank directly whenever hot water is modelled; that pipe is left out above to keep the sketches readable. On a single-tank layout a wood tank, if you have one, is drawn feeding the buffer tank — its heat is folded in rather than stored separately.
| Layout | What it is | Requires | Selectable |
|---|---|---|---|
| No mixing valve | Everything the pump makes reaches the emitters; the tank is a pass-through with a standing loss | no throttling mixing valve | yes |
| One tank behind a valve | The valve regulates one shared flow to every circuit; wood heat, if any, is folded into the heat-pump tank | a throttling mixing valve | yes |
| Two tanks, one 4-way valve | A wood tank beside the heat-pump tank; the valve draws wood-first while usable and feeds both floors in parallel. With the DHW coil option, the hot water tank is drawn off the wood tank too | a throttling valve, two zones and a wood-tank top probe | yes |
| Valve on the radiators, slab fed direct | Only the radiator circuit sits behind the valve; the slab drinks raw tank water | a throttling valve, two zones, and no wood-tank probe | yes |
| Separate slab shunt | A second shunt on the slab circuit | — | no — recorded as a known layout, not selectable until physics exists for it |
Services
15 services are registered under the heatpump_optimizer domain. The ten
that act on a specific config entry also accept an entry_id: optional on
nine, where omitting it applies the call to every loaded entry, which is what a
single-heat-pump install wants, and required on factory_reset. Of those ten,
assign_entity, apply_topology, apply_schedule, debug_collect and
factory_reset write configuration back into the entry —
debug_collect's start turns the collection option on, which reloads the
entry — and the other five act on the running coordinator. run_optimization,
set_away, set_mode, set_thermal_parameters and simulate_plan always act
on every loaded entry.
The services are registered when the integration loads and stay registered
while every entry is unloaded, so an automation that names one still validates.
A call that finds no loaded entry — or names an entry_id that does not exist
or is not loaded — fails with a validation error rather than doing nothing.
| Service | Fields | Returns |
|---|---|---|
run_optimization |
none | — |
set_away |
active, return_time (at least one required) |
— |
set_mode |
mode (required) |
— |
set_thermal_parameters |
31 optional model fields | — |
simulate_plan |
19 optional comfort, wood and quiet-window fields | always |
apply_schedule |
10 optional schedule fields + entry_id |
optional |
assign_entity |
key, entity_id (both required) + manual_setpoint, entry_id |
optional |
apply_topology |
layout (required), positions, dhw, wood, entry_id |
optional |
apply_manual_plan |
space_slots, dhw_slots, expires_at, entry_id |
optional |
clear_manual_plan |
entry_id |
optional |
restore_learned_snapshot |
entry_id |
optional |
reset_heat_loss_learners |
learners, entry_id |
optional |
factory_reset |
entry_id, scope (both required) |
optional |
diagnose_interval |
entry_id |
optional |
debug_collect |
action (required), entry_id |
optional |
run_optimization fetches prices and weather and re-solves the 24-hour plan
immediately. The Optimize Now button does the same thing. A run that cannot
happen fails with an error — too few price steps available, or the solve
itself failed — instead of acknowledging the call while the old plan stands.
set_away writes the Plan-page away override. At least one field is
required. active turns the override on or off; omit it to leave on/off
unchanged. Turning it off also clears the return time. return_time is an ISO
datetime, or empty to clear; omit it to leave the stored time. Setting a time
while the override is off stores it without turning away on. The Away switch
and the Away Expected Return datetime call this service; they are not a second
store.
set_mode takes mode: auto (full optimization), comfort (hold the
comfort temperature and ignore prices), economy (allow up to 1.5 °C below your
comfort floor to ride out expensive hours, never below 15 °C), boost (maximum
heating power) or off.
set_thermal_parameters writes model parameters at runtime. All 31 fields
are optional and anything omitted is left alone. Unparseable dhw_windows
frames are rejected — the call refuses rather than silently keeping the old
windows. The three quiet-window fields (quiet_silent_windows,
quiet_off_windows, silent_mode_power_fraction) are configuration rather
than physics: they are stored and take effect on the next solve, with the
same overlap refusals apply_schedule applies. The ranges below are the
physics bounds rather than the UI's convenience sliders, so several are wider
than the options pages allow — an automation calling with a zero thermal mass
would otherwise divide by zero inside the model:
- House and slab:
house_thermal_massandslab_thermal_mass(each 0.01–200),house_heat_loss_coefficient(0.01–10),slab_heat_transfer(0.01–50). - Heat pump:
heat_pump_cop_nominal(1.0–8.0). - Two zones:
upper_floor_thermal_mass,lower_floor_thermal_mass(0.01–200),inter_zone_heat_transfer(0.01–50),radiator_power_fraction(0–1). - Solar:
window_area(0.01–500),solar_heat_gain_coefficient(0–1). - Hot water:
dhw_tank_volume(0.01–2000),dhw_setpoint(30–75),dhw_min_temperature(10–70),dhw_daily_consumption(0.01–2000),dhw_cooling_rate(0.01–5),buffer_cooling_rate(0.01–50),dhw_schedule_enabled,dhw_windows,dhw_idle_min_temperature(5–60),dhw_legionella_enabled,dhw_legionella_temperature(55–75),dhw_legionella_interval_days(0.01–60). - Weather:
wind_sensitivity_factor(0–1),rain_heat_loss_multiplier(1–2). - ECL110:
ecl110_pid_time_constant_hours(0.01–24),ecl110_displace_min(−30–0),ecl110_displace_max(0–30).
simulate_plan prices a hypothetical comfort choice against the current
forecast without disturbing operation, and returns the answer directly. Fields,
all optional: target_temp, min_temp, max_temp, comfort_weight,
comfort_temp_day, comfort_temp_night, dhw_setpoint,
dhw_min_temperature, day_start_hour (0–23), day_end_hour (0–24),
dhw_windows, quiet_silent_windows, quiet_off_windows,
silent_mode_power_fraction (0–1), wood_type, wood_packing,
wood_price_sek_m3, wood_furnace_efficiency, wood_slots. An empty
dhw_windows string is meaningful: it simulates having
no guaranteed hot water periods at all. The underlying solve is rate-limited,
so dragging a slider cannot trigger one solve per pixel — this is what the
card's what-if panel calls. A what-if that cannot run fails with an error
rather than returning an error entry inside the response: there is nothing to
compare against before the first plan exists, and not enough price data is the
same failure the live solve would report.
apply_schedule is the save counterpart: it writes day_start_hour,
day_end_hour, comfort_temp_day, target_temperature, dhw_setpoint,
dhw_min_temperature, dhw_windows,
quiet_silent_windows, quiet_off_windows and silent_mode_power_fraction
into your configuration and reloads the entry, so the next plan uses them. The
windows are parsed and canonicalised before storing, and a day window that
would never open is rejected — checked against the values that would be
stored, not only against the ones in the call.
assign_entity assigns or clears one optional sensor slot: key is one of
the 21 assignable configuration keys (outdoor_temp_entity,
solar_radiation_entity, pv_production_entity, indoor_temp_entity,
lower_floor_temp_entity, floor_return_temp_entity,
heat_pump_switch_entity, heat_pump_power_entity, heat_pump_energy_entity,
house_power_entity, heat_pump_mode_entity, heat_pump_defrost_entity,
heat_pump_online_entity, heat_pump_fault_entity,
buffer_tank_temp_entity, mixing_valve_target_entity,
dhw_temp_entity, external_heat_entity, wood_tank_top_entity,
wood_tank_bottom_entity, valve_outlet_temp_entity) and entity_id is the
entity to put there — an empty string clears the slot. manual_setpoint is an
optional number, 0–30, stored as the valve's indoor target when the slot is
mixing_valve_target_entity and ignored on any other slot. The entity must
exist and its domain must be one the slot accepts. This is what clicking a
sensor on the card's Setup tab calls; it writes exactly what the options pages
write.
apply_topology stores the hydronic layout the setup editor snapped to:
layout is one of the four selectable catalog keys above, and positions is an
optional {place: [x, y]} map of cosmetic box coordinates. dhw and wood
are optional booleans that set the hot-water and wood-furnace toggles alongside
the layout. Free-form edge sets
are never stored — the editor matches a drawing against the catalog and saves
only the key.
apply_manual_plan pins exact run slots. space_slots and dhw_slots are
lists of {start, end} ISO datetimes; an empty list means forced off for that
channel, and omitting one leaves it automatic. expires_at defaults to 20 hours
from now and must be in the future. Slots are validated in full before any
coordinator is touched, so a rejected call leaves an existing pin untouched.
Safety still wins: a forced-off slot is released if the house or the tank would
breach a hard floor, and the legionella clock is never skipped.
clear_manual_plan drops the pins immediately.
restore_learned_snapshot rolls every learner back to the last healthy
weekly snapshot — the manual counterpart of the drift watchdog. When no
snapshot qualifies (healthy inputs and in-band accuracy at capture time are
required) the call fails with an error instead of answering with an empty
restore. Until the next weekly snapshot after a factory reset, it undoes that
reset instead: every learned store and the dropped settings come back.
reset_heat_loss_learners returns the learned house heat loss scale and the
learned lower floor loss ratio to 1.0, so the plan uses the heat loss values in
the settings as they stand, and the learners start collecting evidence again
from there; the plan is recalculated straight away. learners names which:
house_heat_loss_scale, lower_floor_loss_ratio, or both when left empty. The
comfort weight and the hot-water, COP and defrost learners are left alone. The
Learning Reset Heat Loss button resets both. Changing the indoor or the
lower-floor temperature sensor resets the learner fitted on it the same way,
because evidence fitted against one sensor says nothing about another.
factory_reset returns one entry's scope — settings, learners or
both — to its defaults, exactly as
Reset to factory defaults does, and answers with
the entry and the scope; if Home Assistant refuses to unload the entry, the call
fails and nothing is changed. Within a week of it, restore_learned_snapshot undoes it.
diagnose_interval attributes the last interval's temperature error
input by input and publishes the result on the Prediction Accuracy sensor.
debug_collect takes action: start, stop or status. Collect a week of debug data is the learning page's option that turns the collection on. start turns
the learning page's debug-collection option on, which reloads the entry and
begins the week (or clears a collection that has already finished and begins
again). stop ends it now, which is what the Finalize Debug Collection button
does. status reports how many cycles it holds and how large it is, and that
report is the service response. The collection also stops itself after seven
days. However it ends, five self-tests then run once in the background, read
only and within 15 minutes together: the stored documents against their
declared domains, the accuracy monitor re-derived from its store, one what-if
solve with no change, the inputs' missing and unchanged readings, and the price
and forecast feeds across the week — with the longest gap between published
payloads (a price feed that is failing publishes nothing, so the gap is the
only record of it) and the outage streak the collection ended in. Turning the
option off deletes what was collected. Download diagnostics on the entry
carries the week and those
results; a week over 8 MiB is carried as its summary and the name of the store
file under .storage/ that holds the rows.
Where else to look
- ../README.md — what the integration does, the entity list, and the first 30 minutes
- ../README.md#removal — removing the integration: what deleting the entry does, and what it leaves behind
- how-it-works.md — the mechanisms behind these settings
- dashboard-card.md — the card, its own configuration keys, and the Setup tab
- ecl110.md — the heat-curve path in full: the Danfoss ECL110 over MQTT, and an offset
numberentity
Rendered from docs/configuration.md, which is the source of truth; this page changes only when that file does.